



Atlassian
Connecting Atlassian to NeuBird lets you investigate Jira issues from NeuBird and from Jira itself. On the Marketplace path the Rovo MCP token stays in Jira (Forge encrypted storage). NeuBird never stores that token.
- Create a Forge-auth connection in NeuBird (name and description only).
- Pair the NeuBird app in Jira with a one-time code.
- Paste the Rovo MCP credentials in Jira under Apps → Manage apps → NeuBird.
- Attach the connection to a project, then enable the NeuBird agent on a Jira work item.
The Jira administrator who installs and pairs the app does not need a NeuBird account.
Configuration
Section titled “Configuration”Setup is split on purpose. Pairing fields on the NeuBird connection are output-only (site URL, cloud ID, pairing code). Credential fields for Marketplace installs live on the Jira admin page.
In NeuBird (Connections)
Section titled “In NeuBird (Connections)”Create the connection with Forge app auth. Do not type forge into a text field, and do not paste an API token here.
| Field | Required | Where it is | Description |
|---|---|---|---|
| Name | Yes | Create / edit form | A descriptive name for this connection |
| Description | No | Create / edit form | Optional notes |
| Auth mode | Yes | Create / edit form | Forge app for Marketplace installs. API token is the legacy path only |
| Generate code | After save | Configuration tab → Connect a Jira site | Mints a one-time pairing code. Not a form field |
| Linked site URL | After pairing | Configuration tab → Connect a Jira site | Written back when Jira redeems the code. Read-only |
After pairing, NeuBird investigations vend Jira credentials at query time from the app. Editing the connection name or description does not clear the linked site.
In Jira (Apps → Manage apps → NeuBird)
Section titled “In Jira (Apps → Manage apps → NeuBird)”| Field | Required | Description |
|---|---|---|
| Pairing code | Yes, once | Paste the code from NeuBird. Format NB-XXXX-XXXX. Single-use, expires in 15 minutes |
| Instance URL | Yes | Your Atlassian site, for example https://yourcompany.atlassian.net |
| Atlassian account email | Yes | The account that owns the Rovo MCP token |
| Rovo MCP API token | Yes | Scoped token created at id.atlassian.com. Stored only in this app |
The admin page shows Rovo MCP token: Saved in this app after a successful save. Disconnecting unbinds the site; it does not delete the NeuBird connection.
Attach the connection to a project
Section titled “Attach the connection to a project”Investigations started from Jira need a NeuBird project that includes this Atlassian connection. Add it under Projects the same way you attach any other data source. If the connection is not on a project, assigning NeuBird on a Jira issue cannot start a session.
Create a Forge-auth connection
Section titled “Create a Forge-auth connection”In NeuBird, go to Connections, add an Atlassian connection, and choose Forge app as the auth mode. You do not paste an API token here.
After you save, generate a pairing code on this same connection (see Pair the NeuBird app in Jira below). Pairing is not a form field — it lives under Connect a Jira site on the Configuration tab.
You can also generate a pairing code on an existing API token connection. Pairing binds the Jira site; it does not convert that connection to Forge or drop the stored token.
Pair the NeuBird app in Jira
Section titled “Pair the NeuBird app in Jira”Do this after the data-source connection exists. Pairing binds your Jira site to this NeuBird organization. Without it, the NeuBird app in Jira cannot resolve your deployment.
-
In NeuBird, go to Connections and open your Atlassian (Jira) connection.
-
Open the Configuration tab.
-
Under Connect a Jira site, click Generate code.
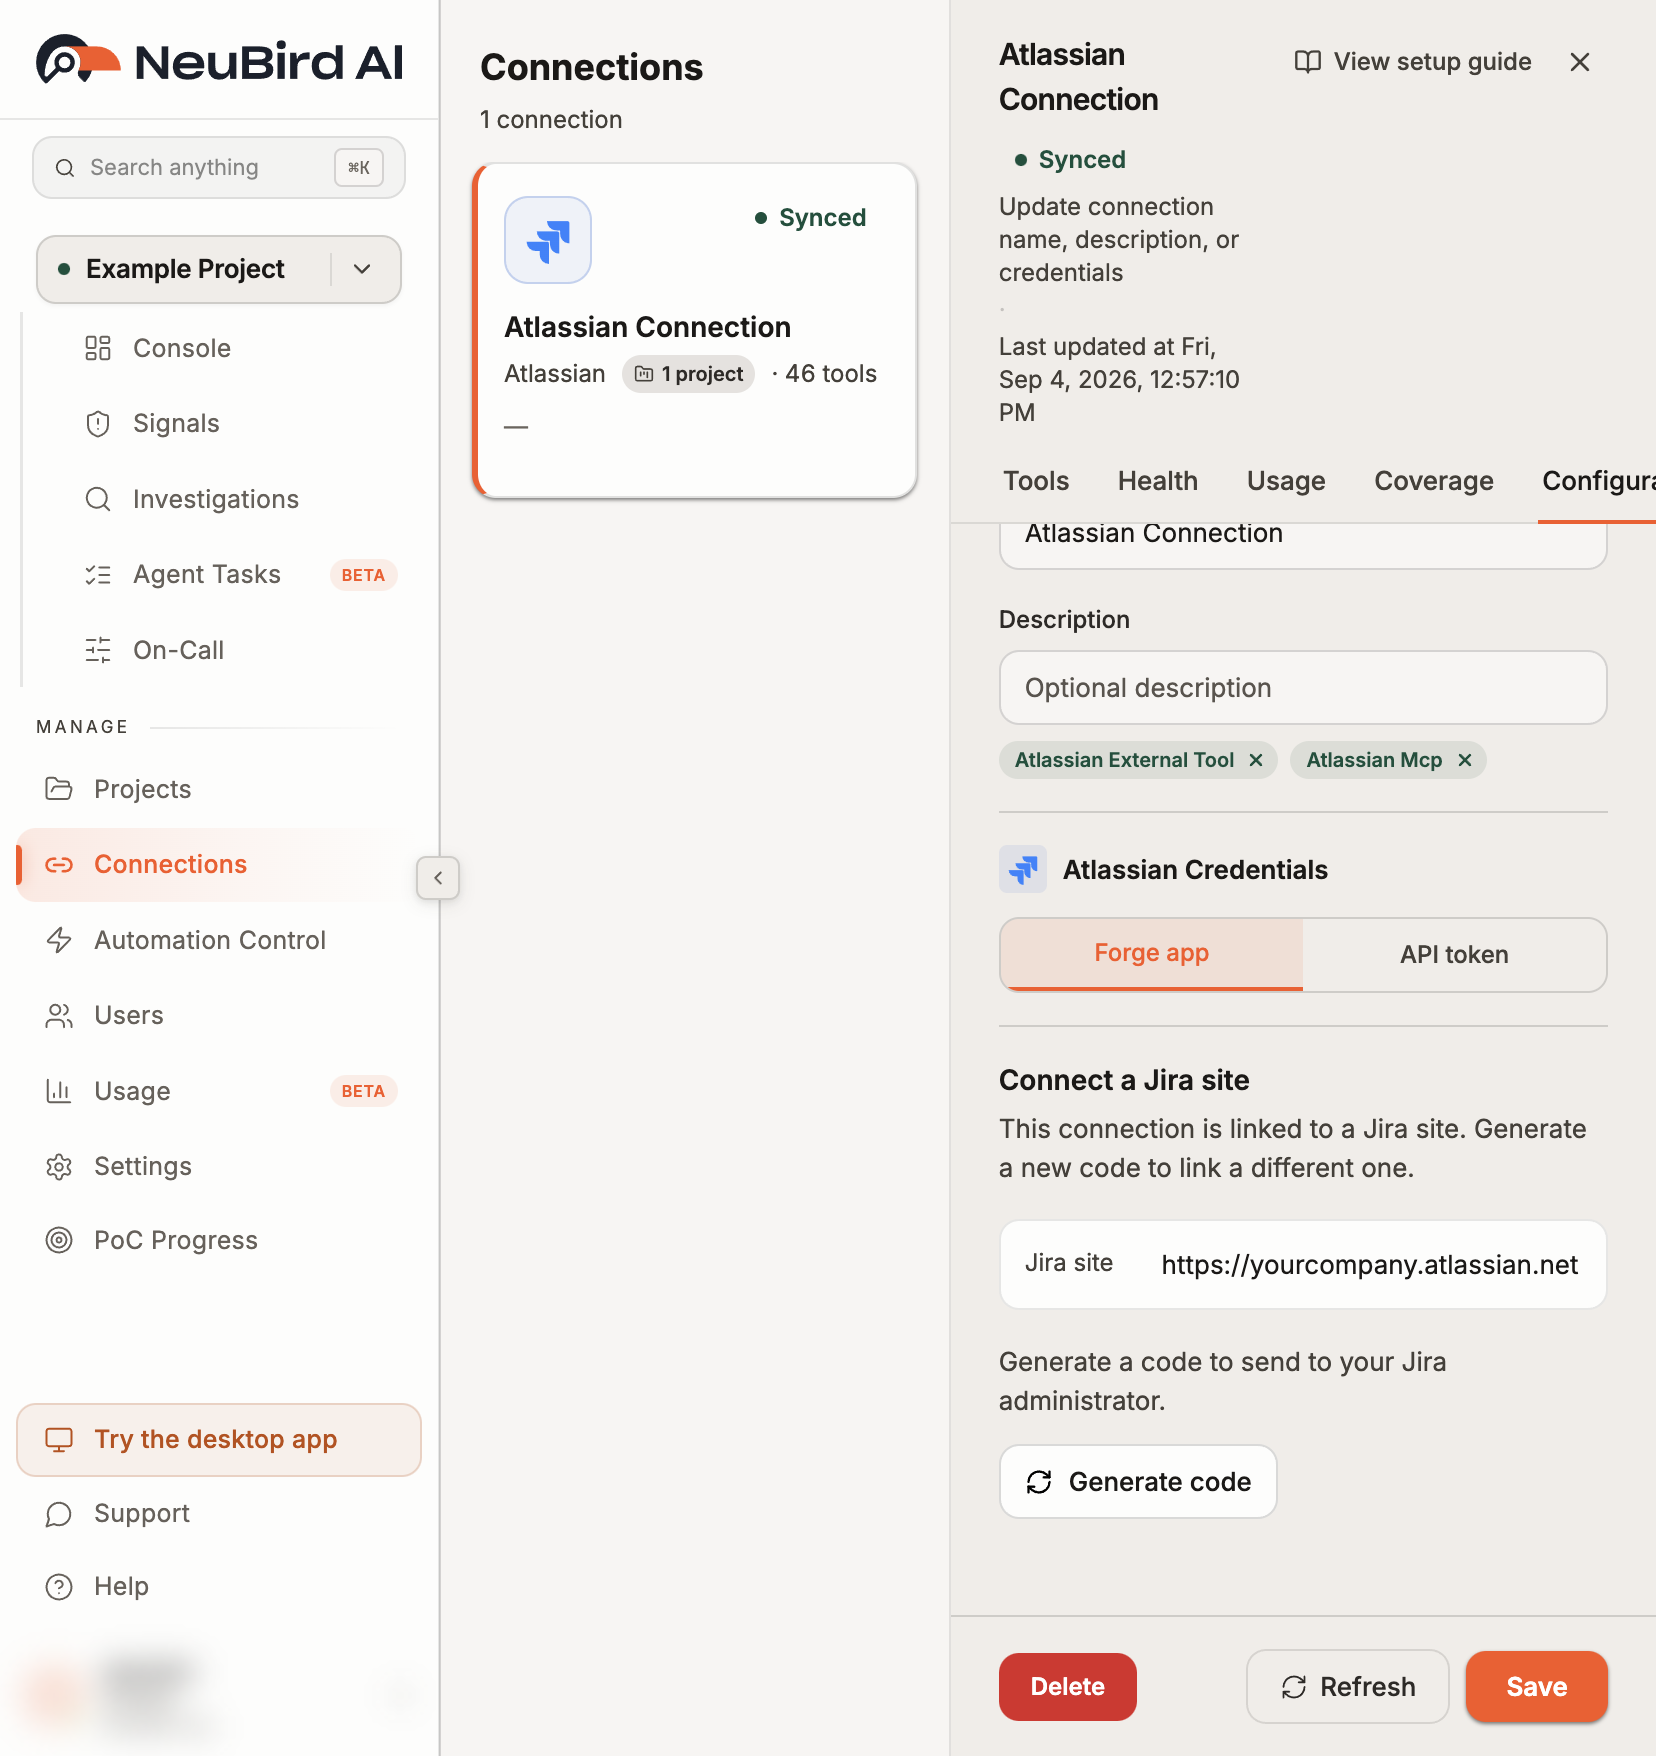
-
Copy the pairing code. NeuBird shows it in plaintext once. It is single-use and expires in 15 minutes.
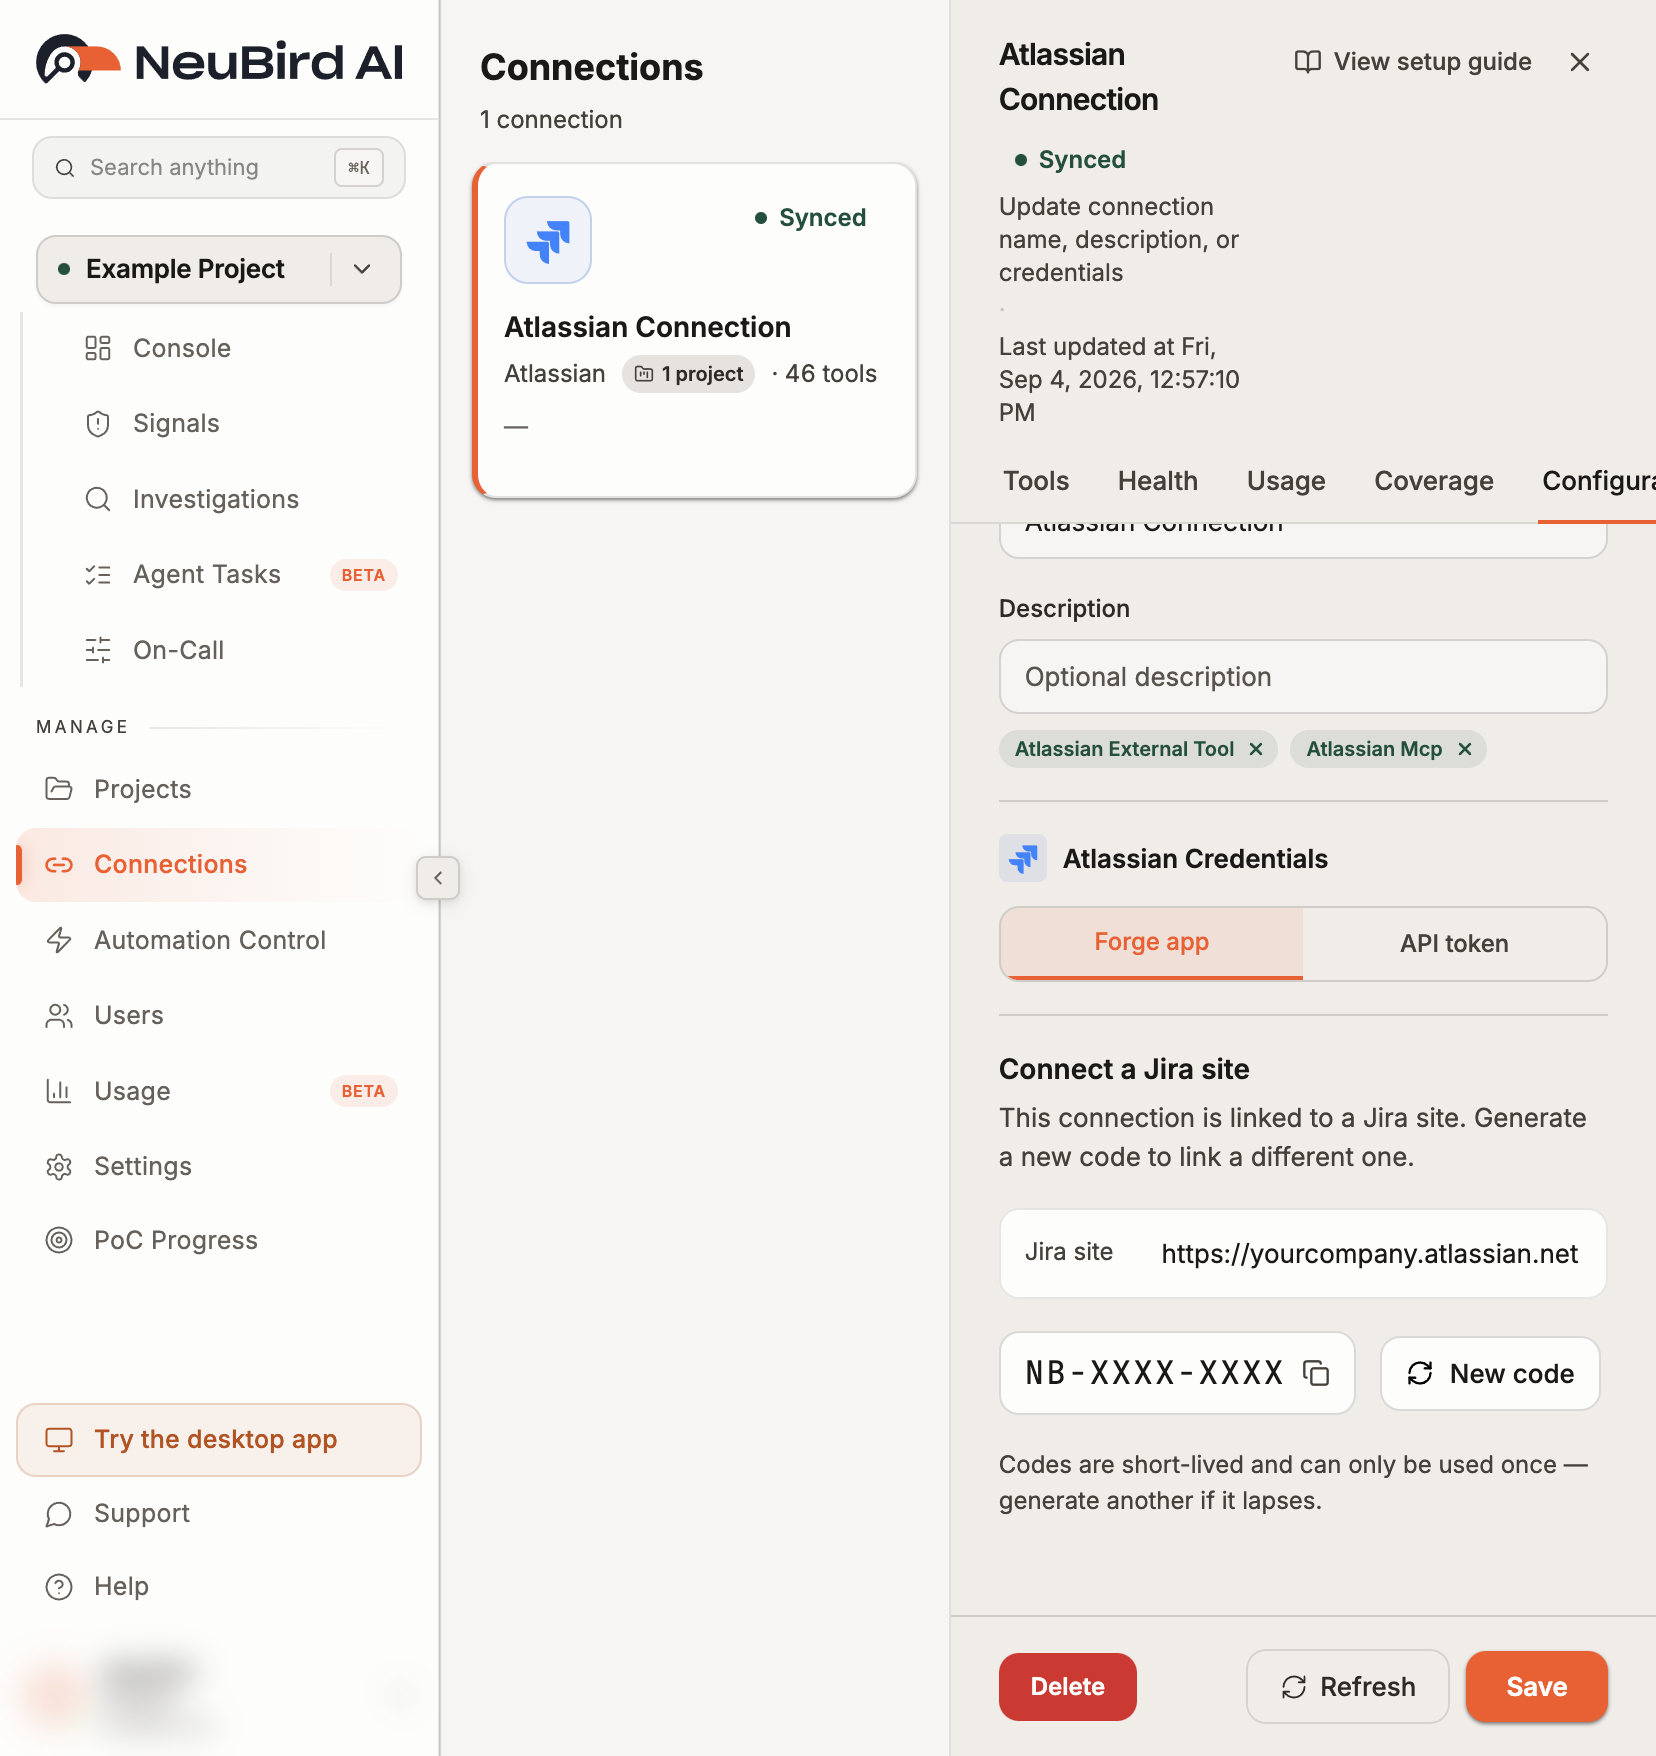
-
Send the code to whoever administers your Jira site.
-
In Jira, they open Apps → Manage apps → NeuBird and enter the code once.
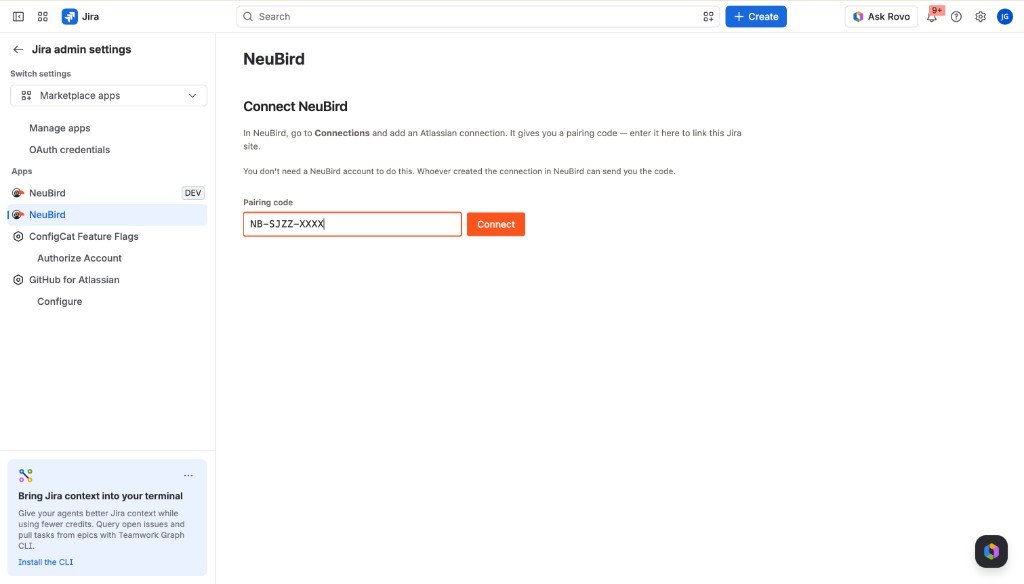
When pairing succeeds, the NeuBird connection shows the linked Jira site URL under Connect a Jira site. Then paste the Rovo MCP credentials on that same Jira admin page (instance URL, Atlassian account email, and token). Those values stay in Forge encrypted storage.
If the code expires or you need another site
Section titled “If the code expires or you need another site”On the same Configuration tab, click Generate code again (or New code if a live code is still on screen). A new code does not invalidate the previous one — the old code expires on its own schedule. Generate another if it lapses or if you need to link a different Jira site.
Create a Rovo MCP API token
Section titled “Create a Rovo MCP API token”You will need a Rovo MCP scoped API token. Paste it in Jira (Apps → Manage apps → NeuBird) after pairing — not into the NeuBird connection form.
Enabling the Atlassian Rovo MCP Server
Section titled “Enabling the Atlassian Rovo MCP Server”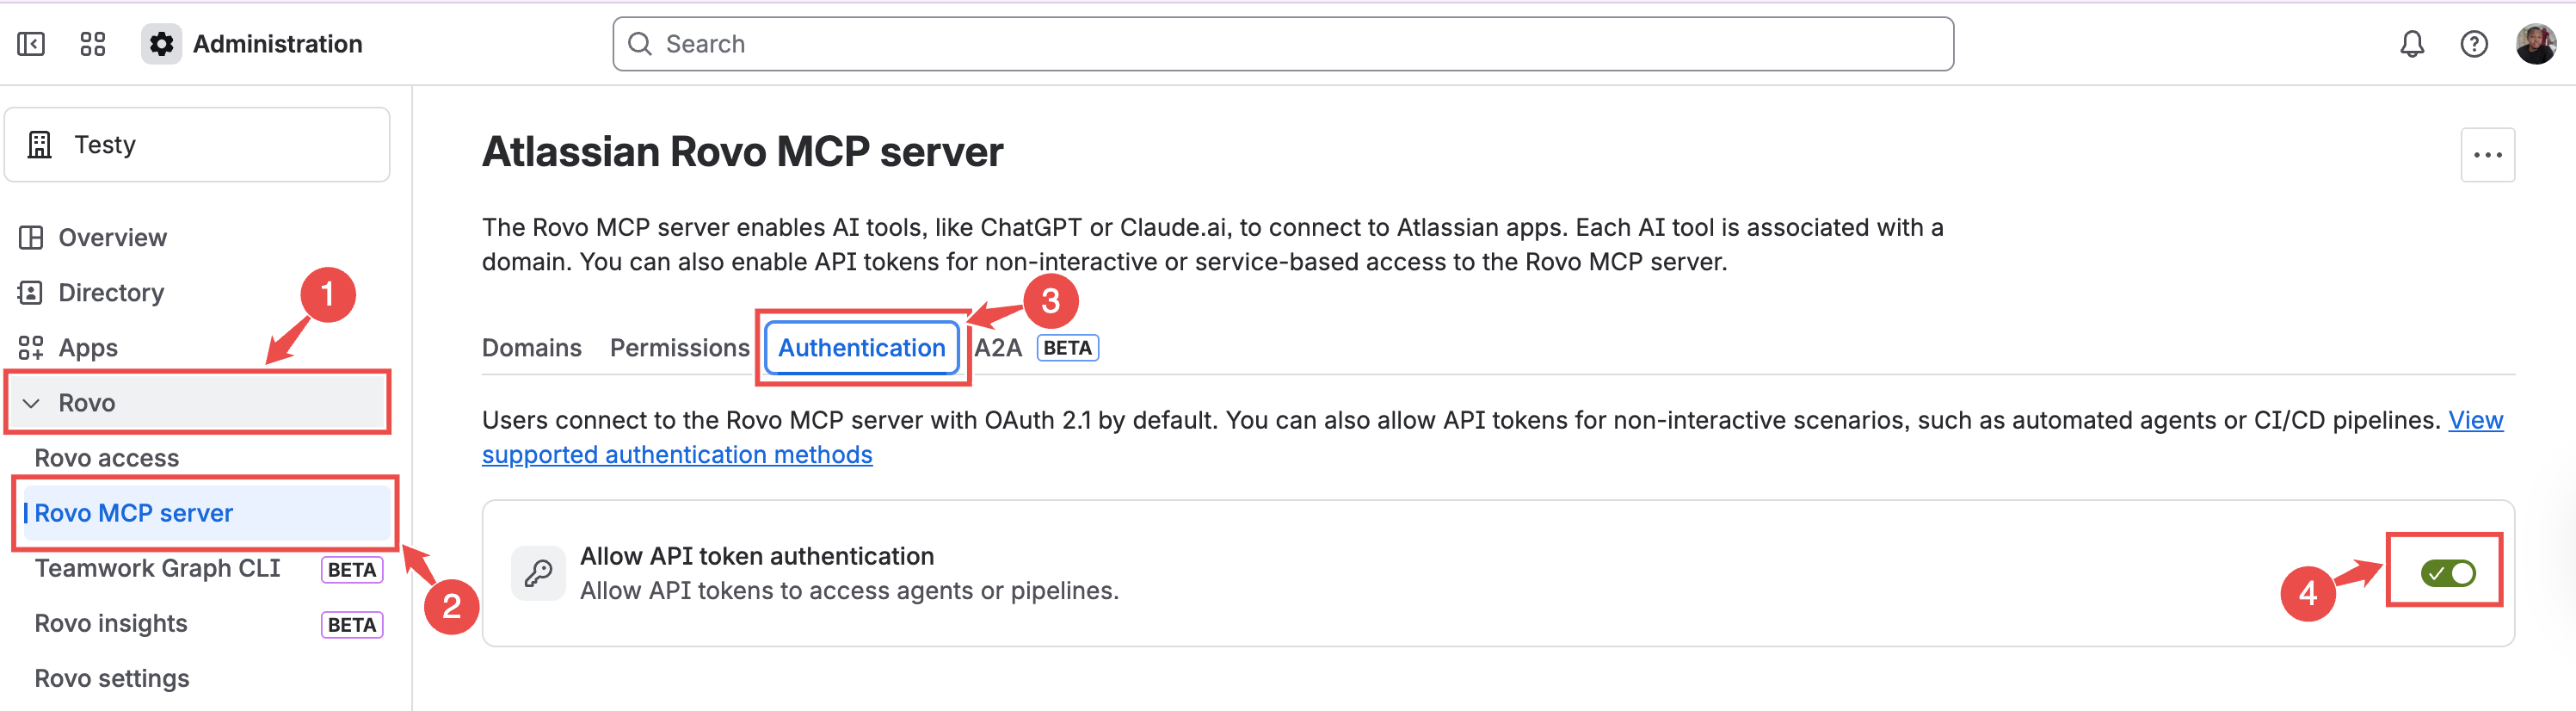
- Go to admin.atlassian.com and select your organization.
- In the left sidebar, navigate to Rovo → Rovo MCP server.
- On the Rovo MCP server page, toggle on API token under Authentication methods. This allows service-based (non-interactive) access to the MCP server.
- Review the scopes granted to the MCP server — by default these include read access to Jira, Confluence, Bitbucket, and JSM resources, plus search capabilities.
Once the admin has enabled API token auth, sign in with any user (or a NeuBird-specific user) that has access to the resources you want investigated.
Create an API token
Section titled “Create an API token”-
Navigate to the API token page: Log into your Atlassian account and go to the API tokens page.
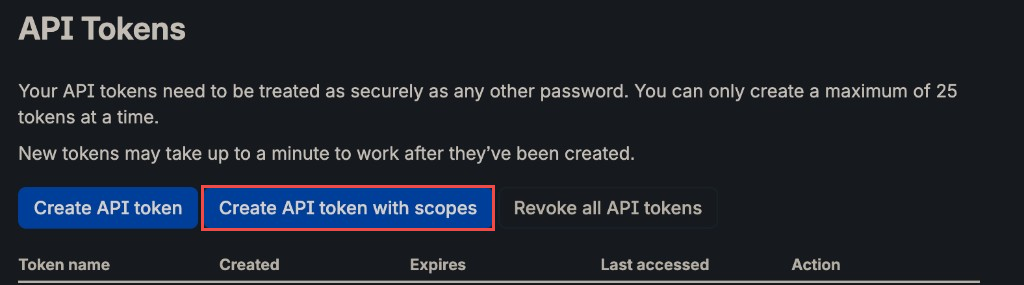
Click Create API token with scopes. Do not use the plain Create API token button — it cannot be scoped to the Rovo MCP server.
-
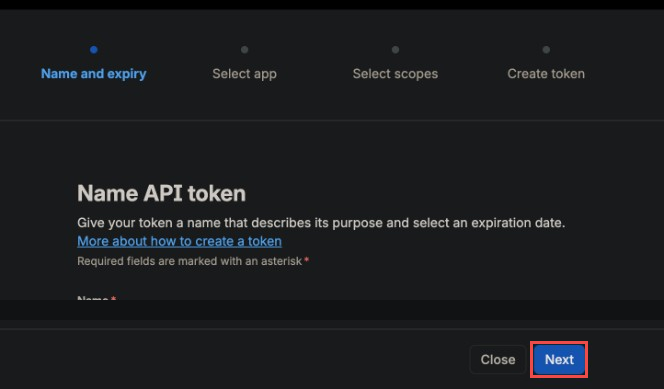
Name your token: Provide a descriptive name and expiration date for the token, then click Next.
-
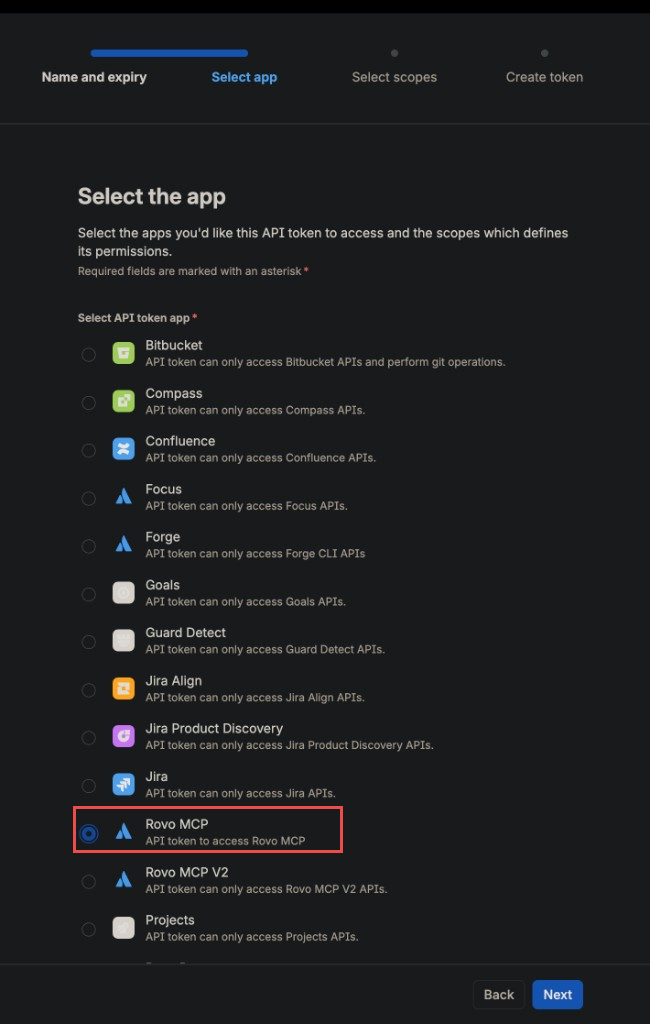
Select the app: Choose Rovo MCP as the app this token will access.
-
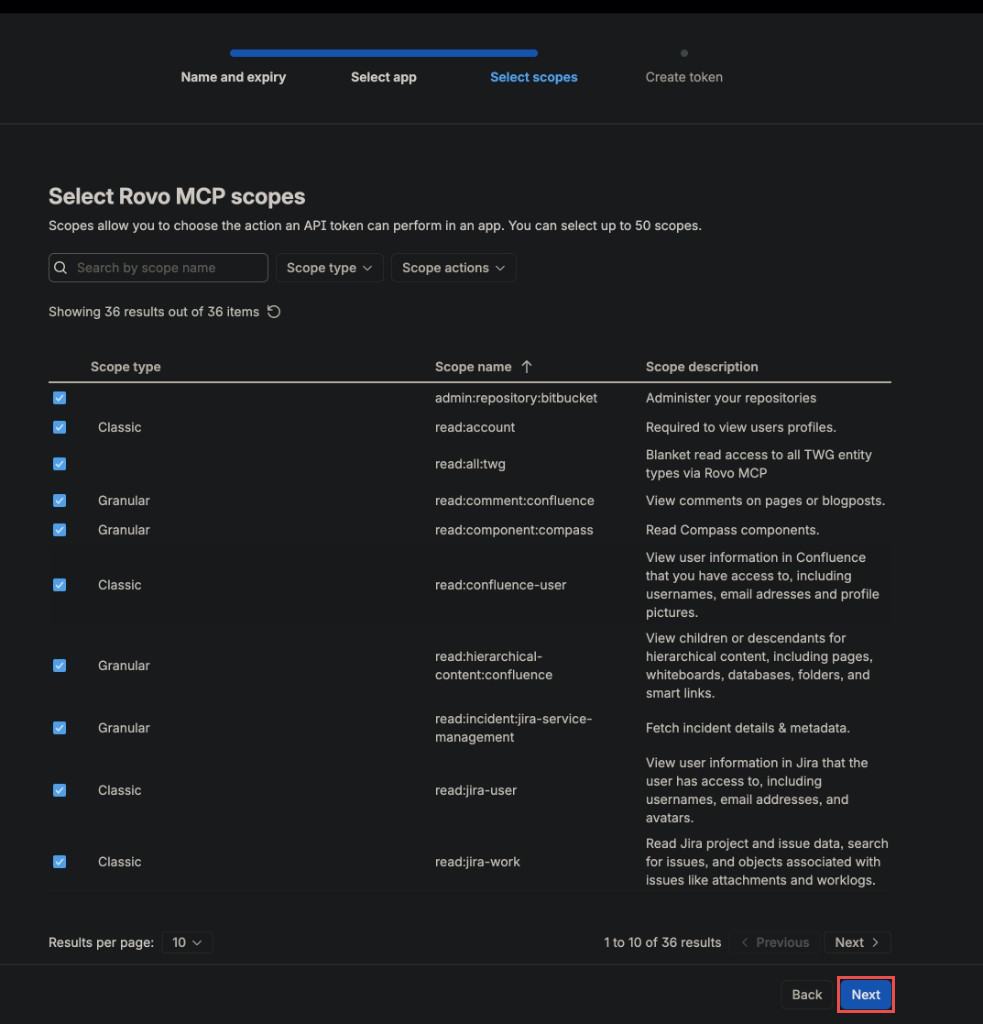
Select scopes: Confirm the page header reads “Select Rovo MCP scopes” (confirming you picked the correct app) and leave the default scopes selected, then click Next.
-
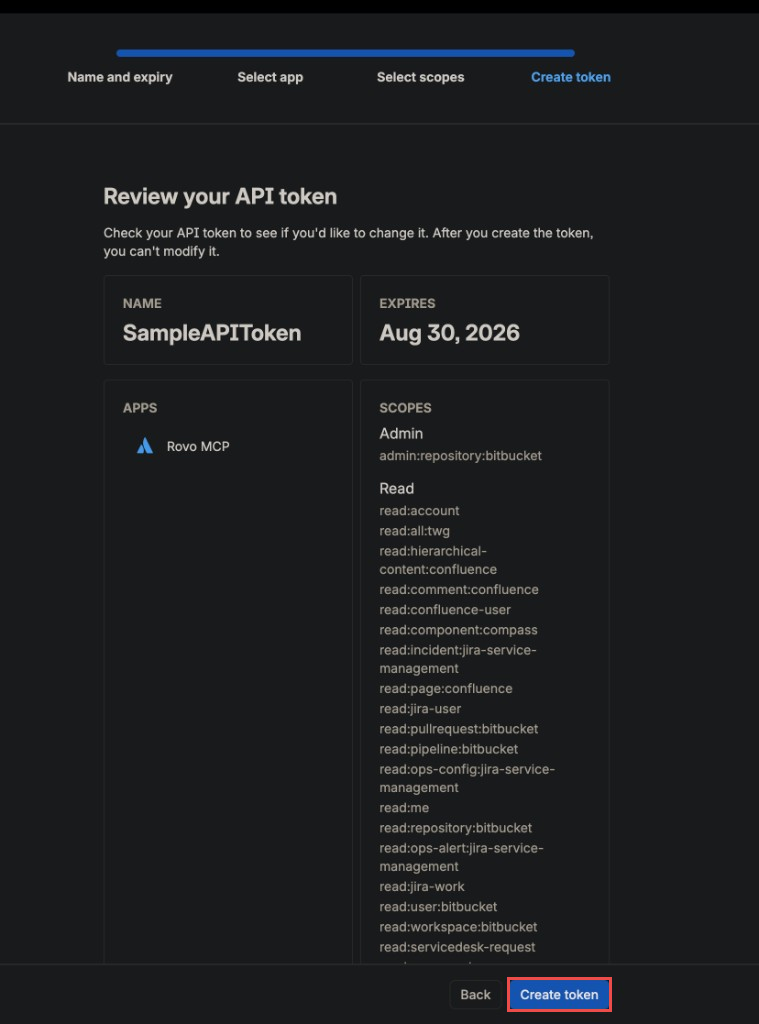
Review and create the token: Confirm the Apps section lists Rovo MCP, then click Create token.
-
Copy the API token: Once generated, click Copy to save the token.
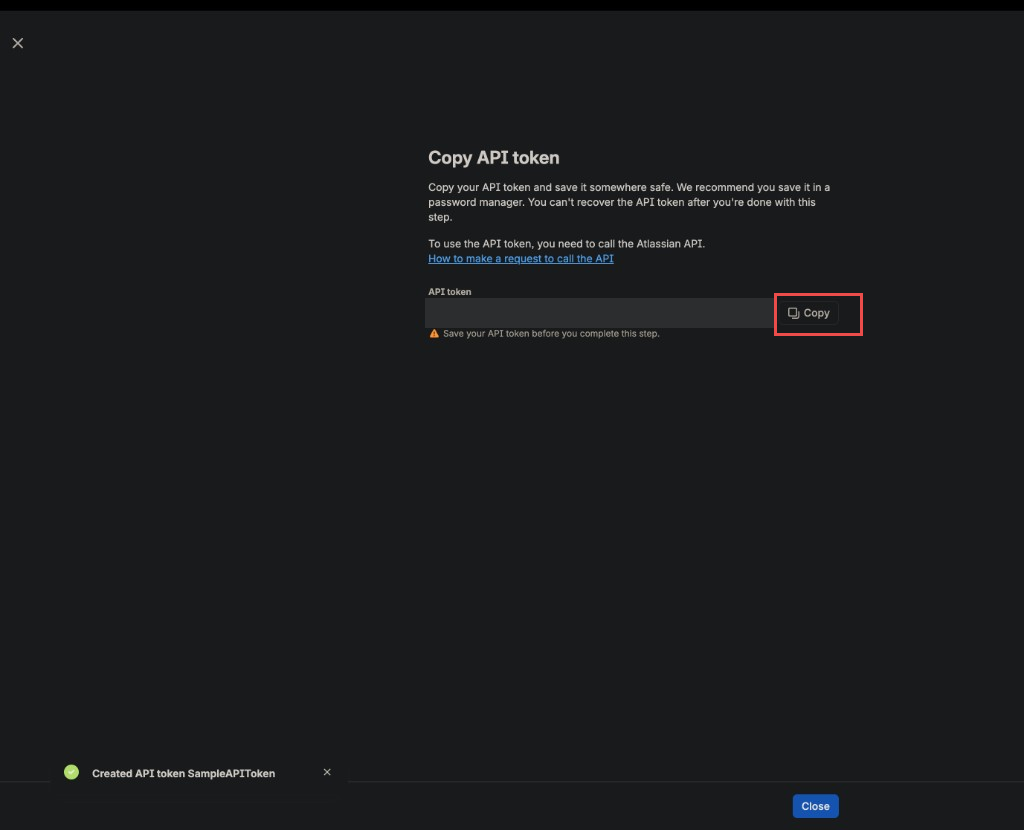
Store this token securely — it will not be displayed again. Paste it in Jira under Apps → Manage apps → NeuBird after the site is paired.
-
Retrieve your instance URL: Open your Atlassian instance in the browser (for example,
https://yourcompany.atlassian.net) and copy the URL from the address bar.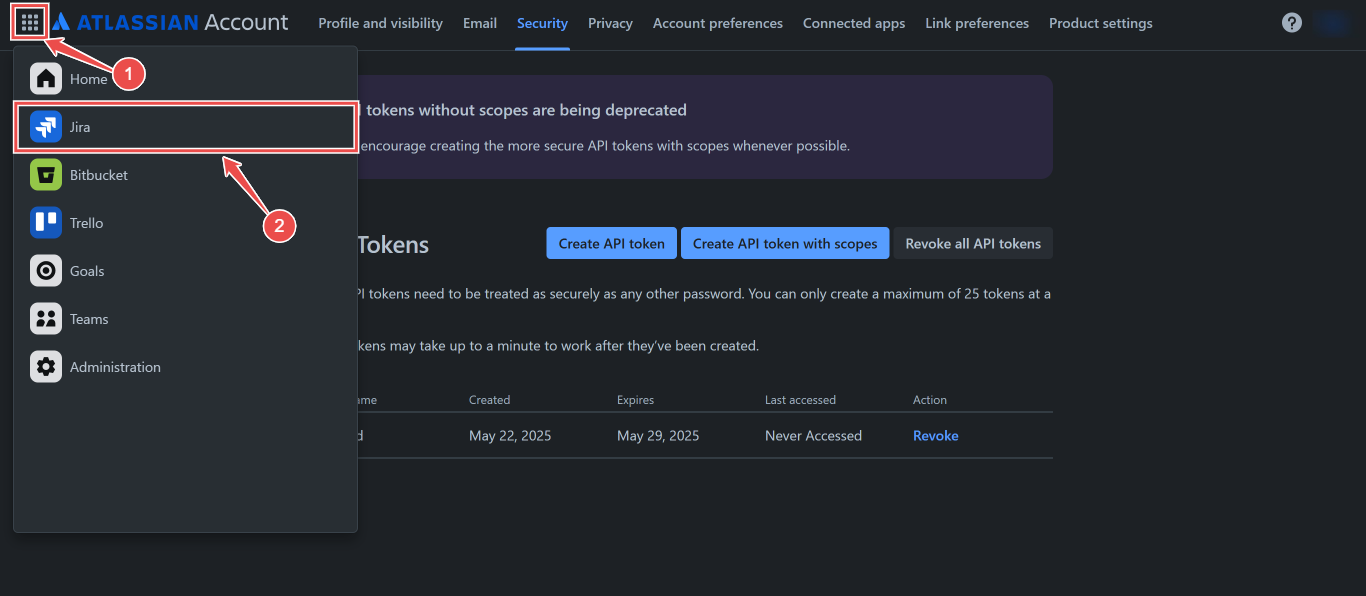
Use NeuBird in Jira
Section titled “Use NeuBird in Jira”The issue panel is read-only: it lists NeuBird signals already linked to that issue. You start and continue investigations from Jira’s Agents / Rovo agent card, not from a Start session button on the panel.
Enable the NeuBird agent (once per site)
Section titled “Enable the NeuBird agent (once per site)”After the app is installed, NeuBird can show as Unavailable until someone enables it for work items:
- Open any Jira work item.
- Open Agents → Browse agents.
- Select NeuBird → Start session → Enable.
There is no Studio Surfaces page for this agent. Enabling it here is what makes assign, mention, and chat available.
Start or continue an investigation
Section titled “Start or continue an investigation”On a work item, use the NeuBird agent card:
- Assign the issue to NeuBird, or
- @mention NeuBird in the Agents / chat UI, or
- Continue in Chat (or Resume work) on an existing NeuBird agent session
Jira then starts (or continues) a NeuBird investigation for that issue. Status comes back on the agent card as the task updates. NeuBird does not post progress as issue comments.
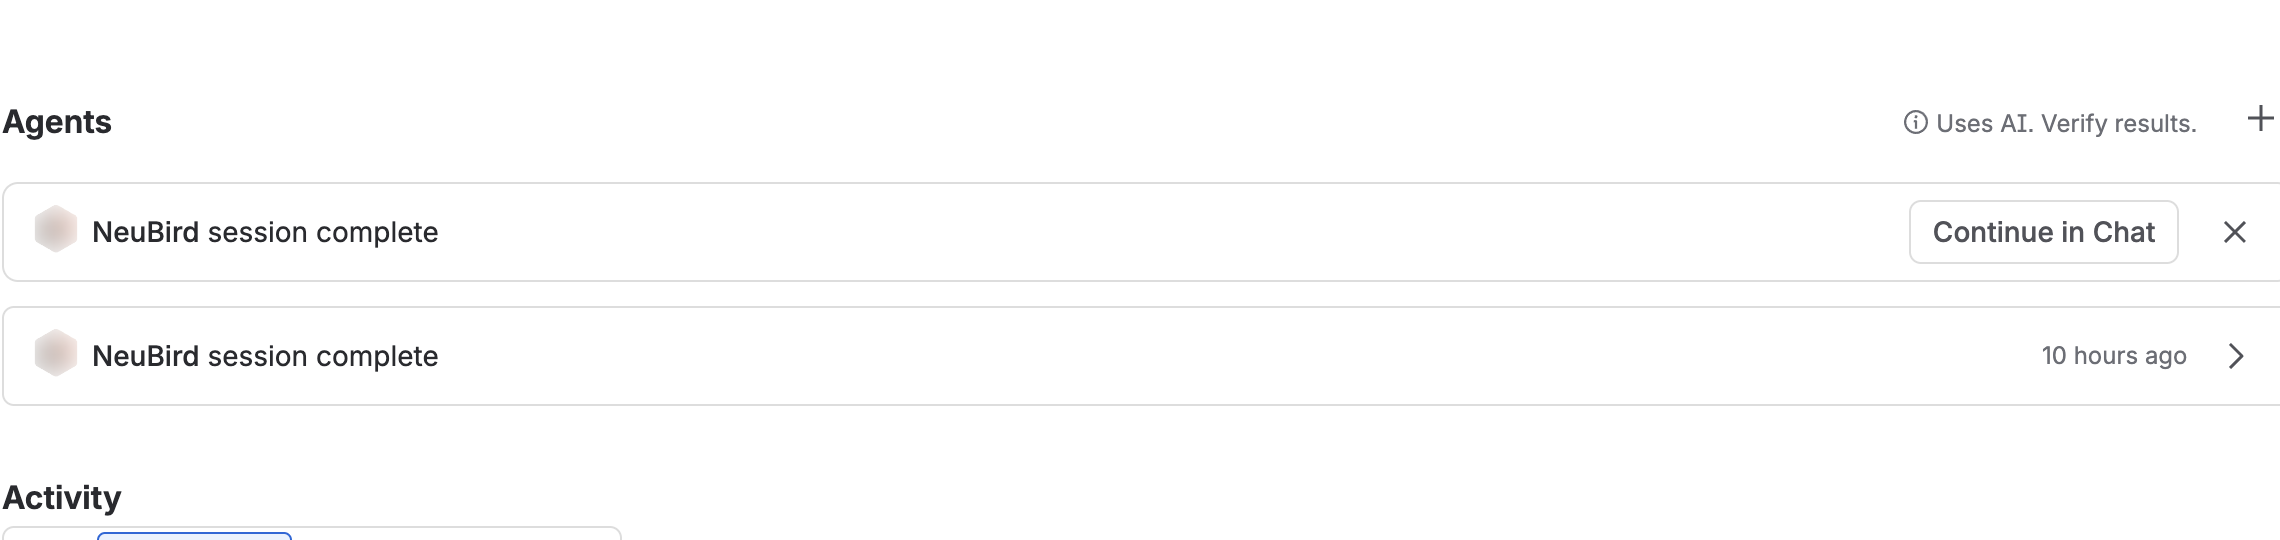
A comment that only @mentions NeuBird through the REST API or a plain issue comment does not start an investigation. Use the Agents / assign / chat controls.
What you should see
Section titled “What you should see”| Surface | What it shows |
|---|---|
| Jira agent card | Running / completed / failed status for the investigation started from this issue |
| Jira issue panel | Linked NeuBird signals for the issue key, with a link into NeuBird |
| NeuBird Investigations | The full session, RCA, and chain of thought |
If assign fails with a project error, add the Atlassian connection to a NeuBird project and try again. If the issue panel says NeuBird is not connected, a Jira admin still needs to redeem a pairing code under Apps → Manage apps → NeuBird.
Legacy: API token stored in NeuBird
Section titled “Legacy: API token stored in NeuBird”Use this only when the Forge app is not installed (for example a non-Marketplace or customer-hosted setup). Choose API token as the auth mode and enter:
| Field | Required | Description |
|---|---|---|
| Name | Yes | A descriptive name for this connection |
| Description | No | An overview of what this connection is used for |
| API Token | Yes | The Rovo MCP scoped API token |
| Instance URL | Yes | Your Atlassian instance URL (e.g., https://yourcompany.atlassian.net) |
This path is not part of the Marketplace app surface. Marketplace installs should use Forge app auth and paste the token in Jira.
For general instructions on creating and managing connections, see the Connections Overview.