



ServiceNow
Connecting ServiceNow to NeuBird enables you to gather critical telemetry from your ServiceNow environment, including incident management and service requests.
NeuBird supports two ways to authenticate against your ServiceNow instance. Pick one; you do not need both.
- API Key: you create a REST API key in ServiceNow and paste it into NeuBird along with your instance URL. Simplest to set up. The key is long-lived and tied to the user or service account you select.
- OAuth 2.0 (Authorization code grant): you register NeuBird as an inbound OAuth integration in ServiceNow, then complete a browser sign-in from the NeuBird connection dialog. NeuBird stores only a refresh token, and API calls run with the consenting user’s context. Recommended when your security policy discourages static API keys.
Both methods require your ServiceNow instance URL (for example https://acme.service-now.com) and both finish with the same REST API Access Policies.
Option 1: API Key Setup
Section titled “Option 1: API Key Setup”Before connecting ServiceNow to NeuBird, you need to generate an API key from your ServiceNow instance.
-
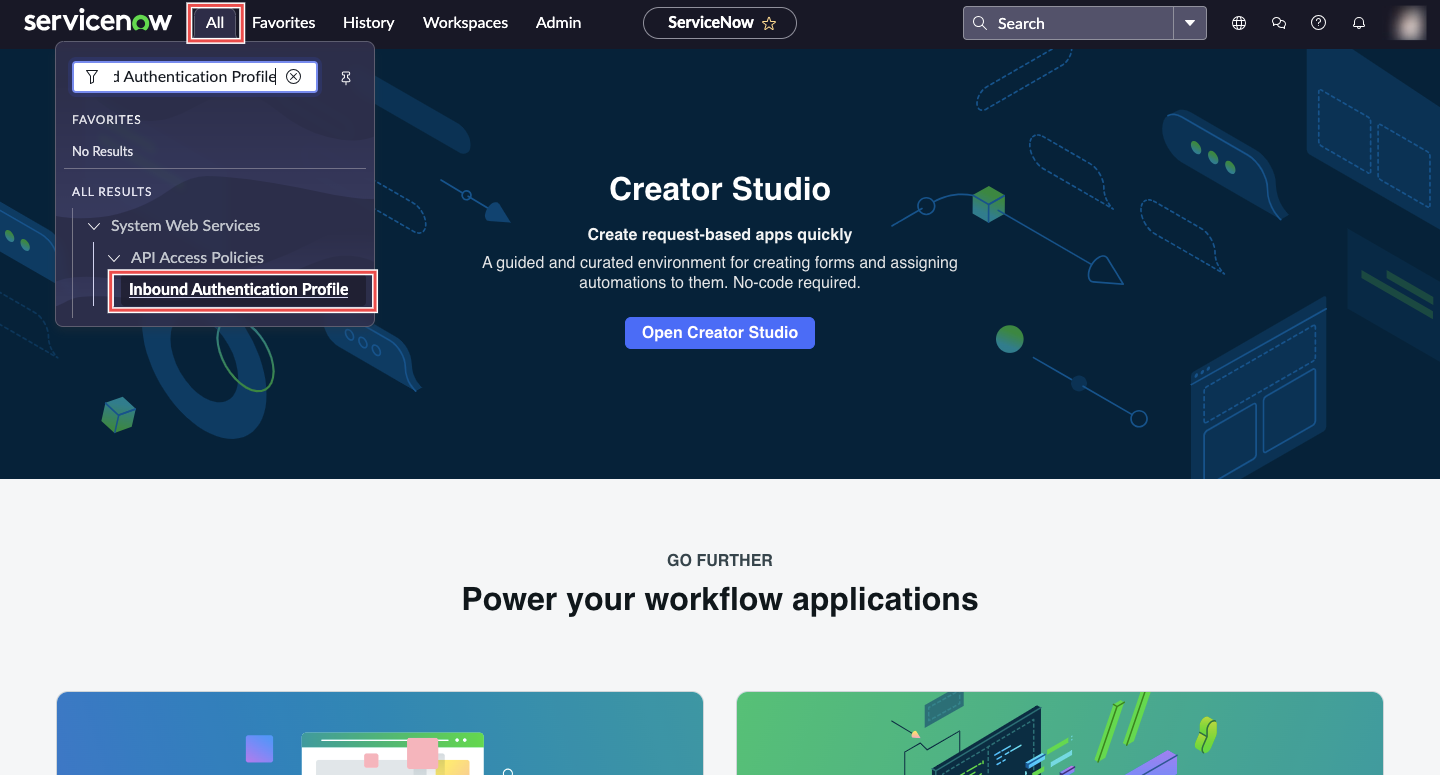
Navigate to the API Access Policies: In your ServiceNow dashboard, go to All > System Web Services > API Access Policies > Inbound Authentication Profile.
-
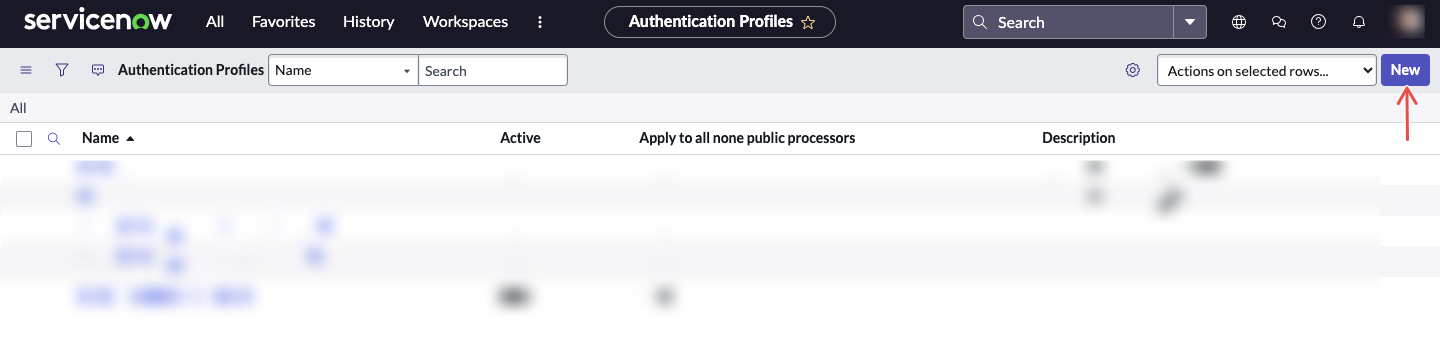
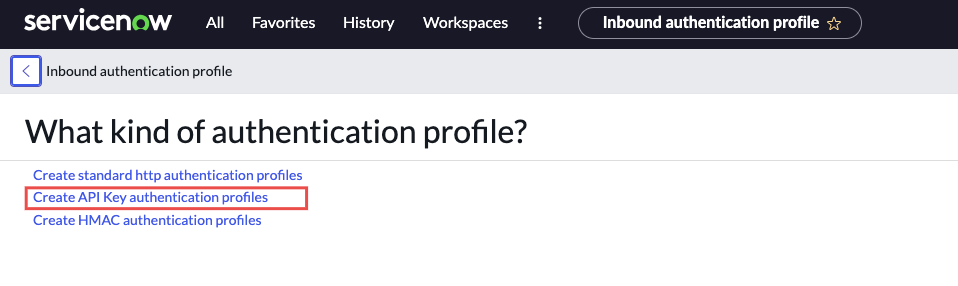
Create a new API Key: Click New, and then select Create API Key authentication profiles.
-
Enter API details:
- Enter a descriptive name for the key in the Name field.
- In the Auth Parameter field, select Auth Header.
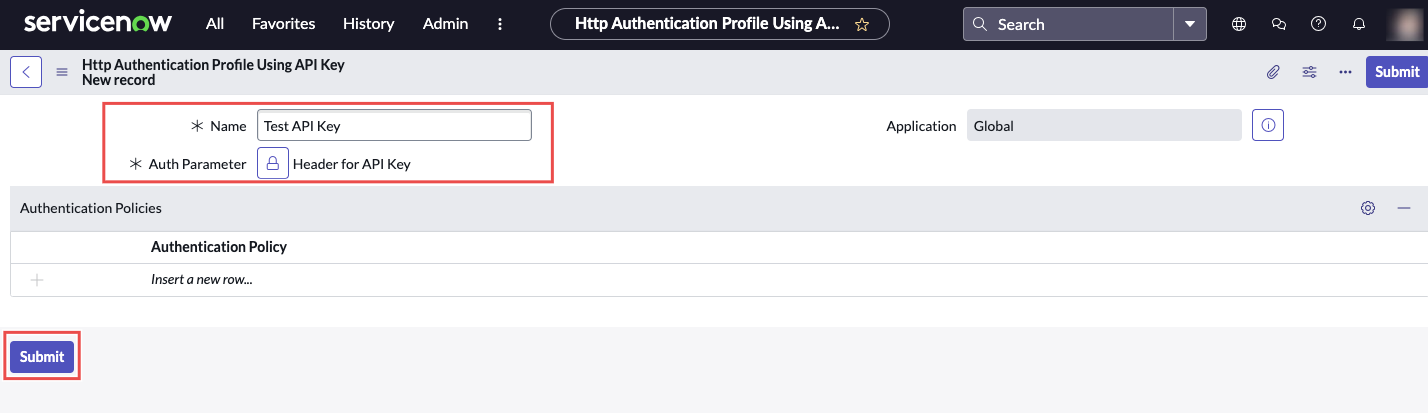
After completing the above steps, click Submit to save your API key profile.
-
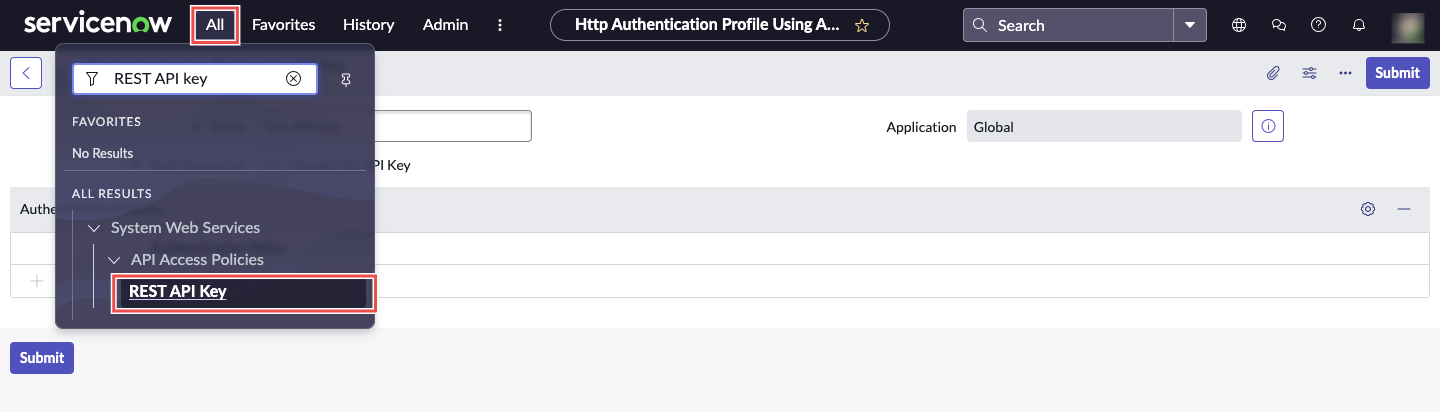
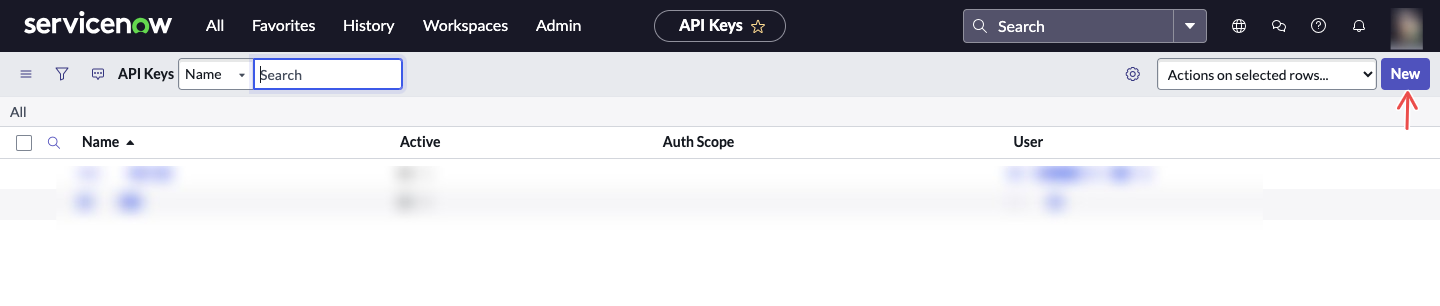
Generate the REST API Key: Go to All > System Web Services > API Access Policies > REST API Key, and click New.
-
Enter REST API details: Provide a descriptive name and select a user or service account for the API key.
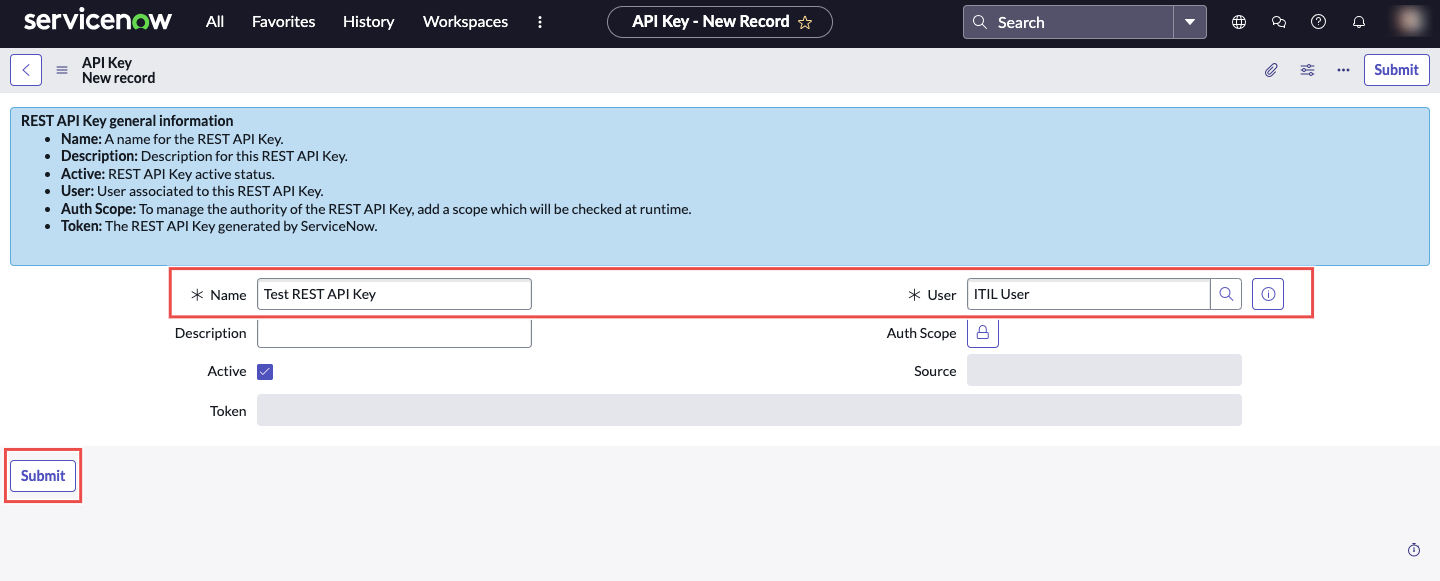
After completing the above steps, click Submit to save your REST API key.
-
Create the REST API Access Policies: follow REST API Access Policies, attaching the API Authentication Profile you created above to each policy.
Once the Table API policy is saved, a token is generated. Use the lock icon to view and copy it — this is the API Key you enter in NeuBird.
Continue to Add the Connection in NeuBird and use the Credentials tab.
Option 2: OAuth 2.0 Setup
Section titled “Option 2: OAuth 2.0 Setup”OAuth setup has three parts in ServiceNow, followed by the browser sign-in from NeuBird:
- Register NeuBird as an inbound OAuth integration. This produces the Client ID and Client Secret you enter in NeuBird.
- Create an Inbound Authentication Profile of type OAuth that points at that integration.
- Create the REST API Access Policies that use the authentication profile.
Step 1: Register the inbound OAuth integration
Section titled “Step 1: Register the inbound OAuth integration”-
Open Inbound Integrations: In your ServiceNow instance, click All and search for
inbound integrations. Under System OAuth, select Inbound Integrations.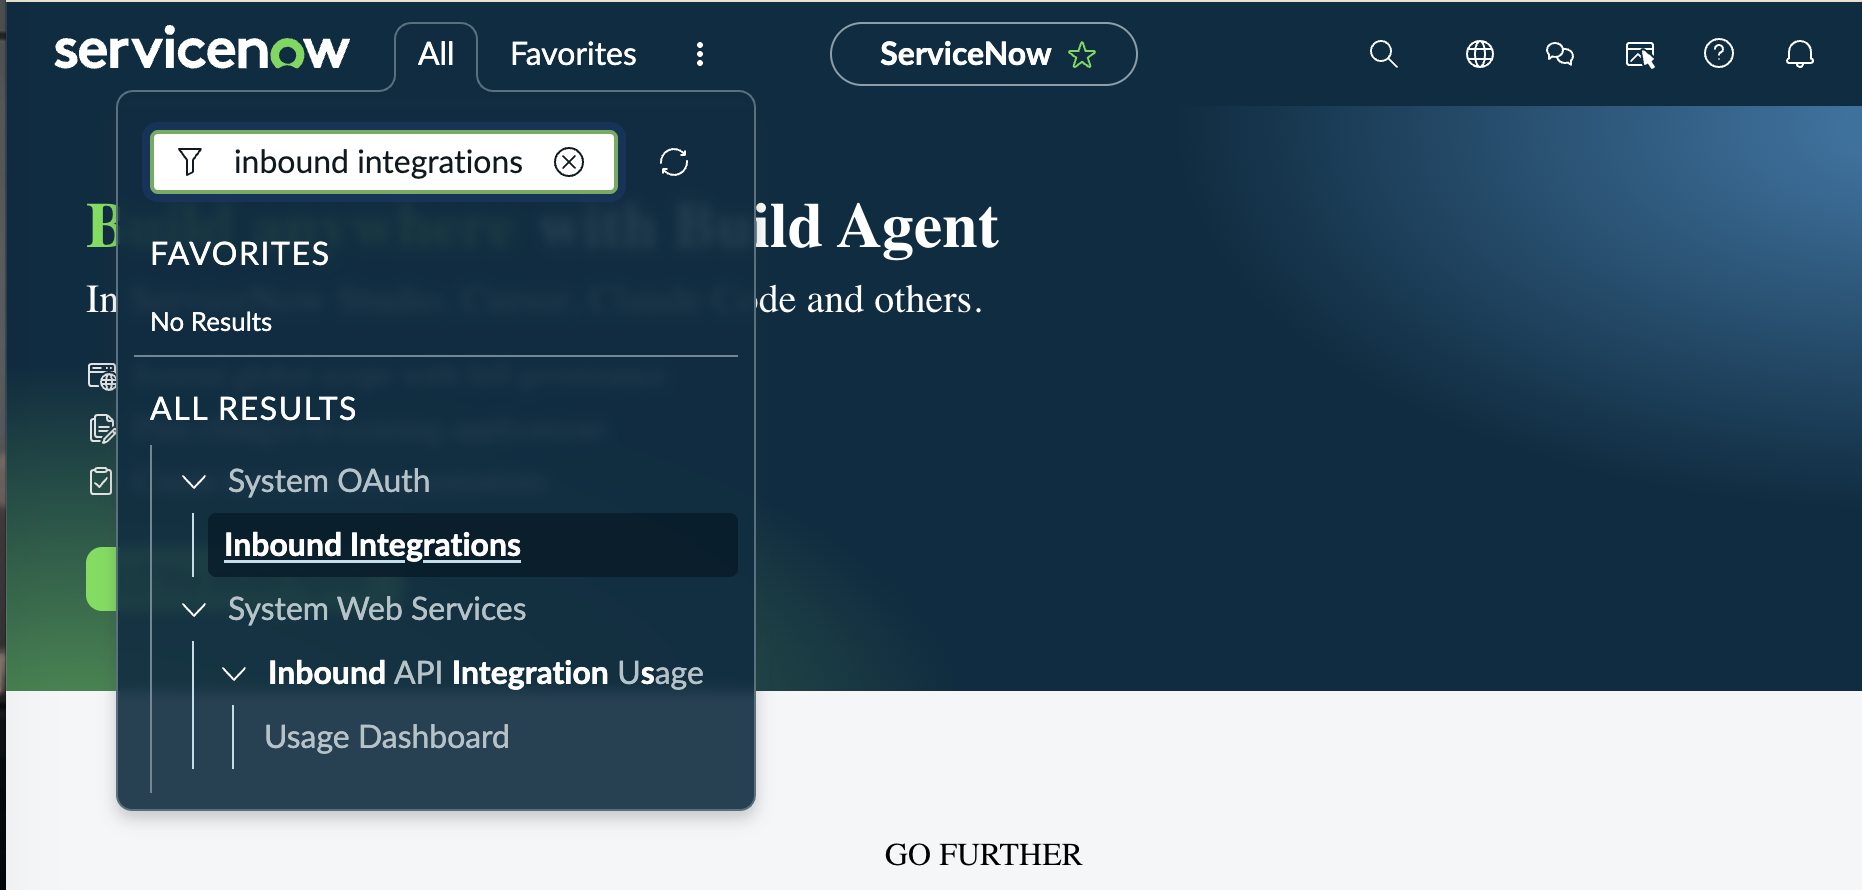
-
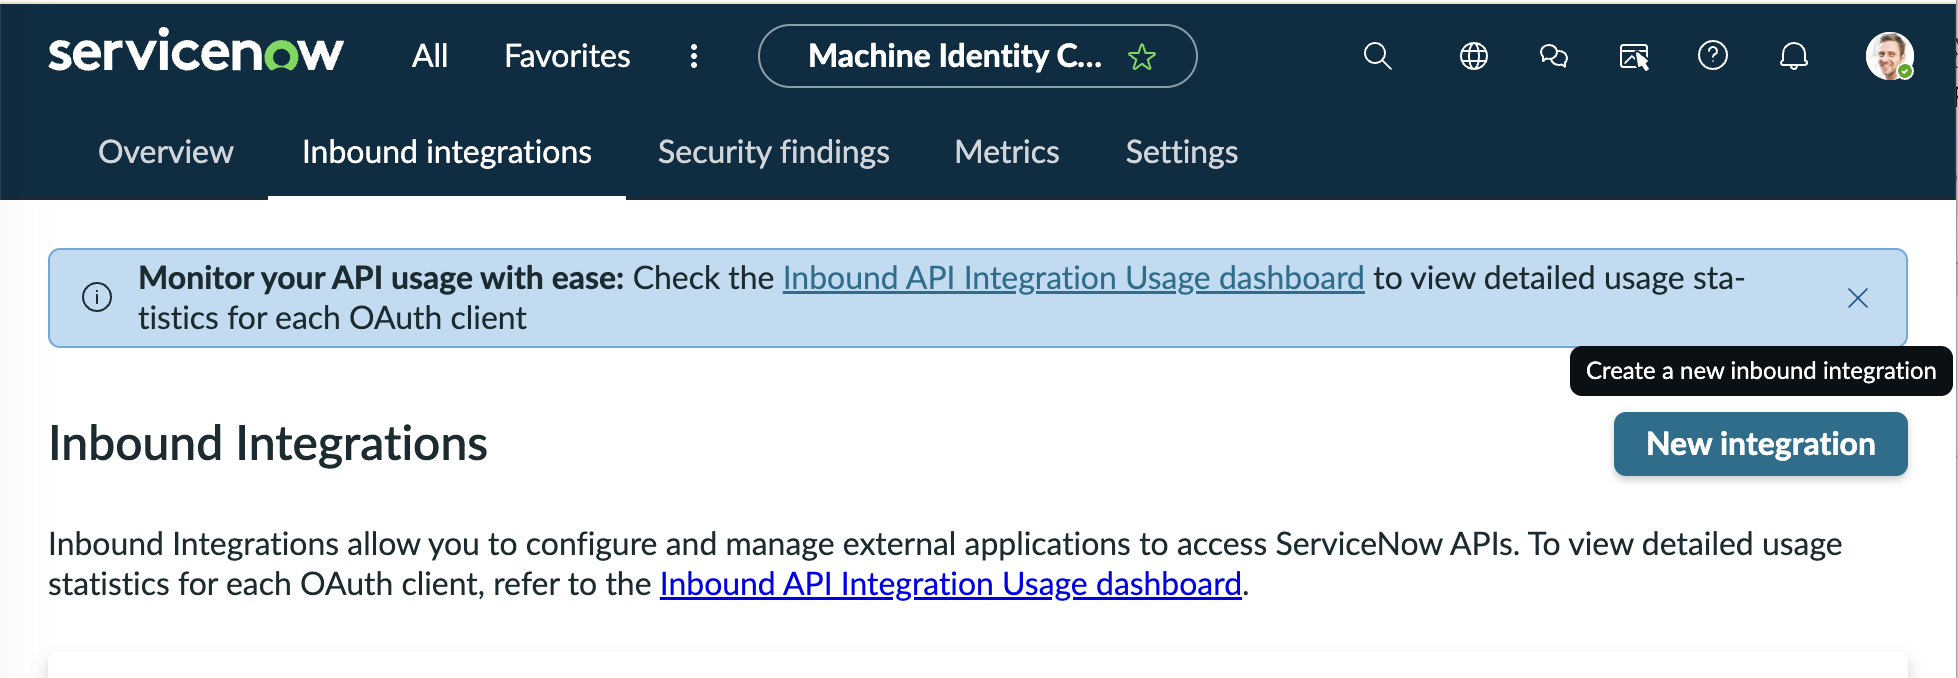
Create a new integration: Click New integration in the upper-right corner of the Inbound Integrations page.
-
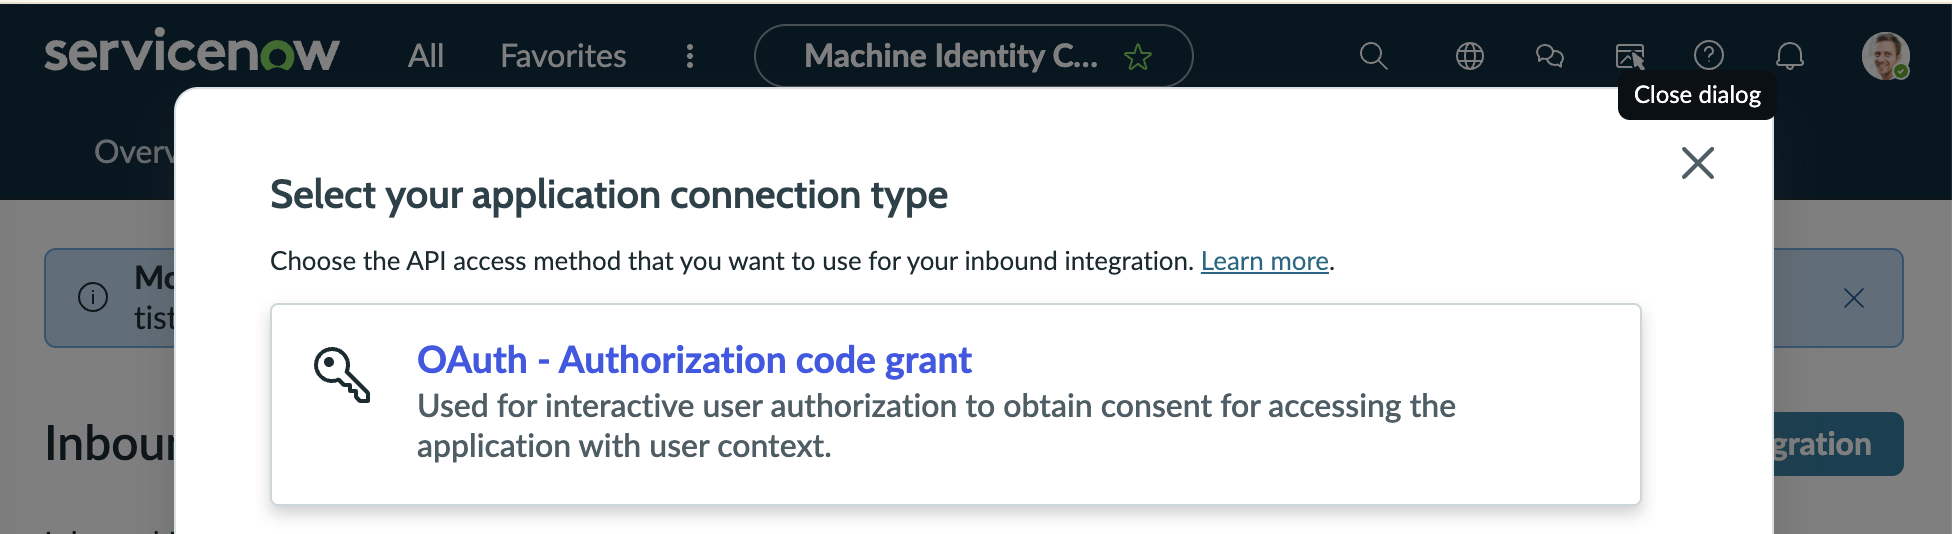
Choose the connection type: In the Select your application connection type dialog, choose OAuth - Authorization code grant. This is the only grant type NeuBird supports, because it is what lets ServiceNow issue a refresh token after an interactive user consent.
-
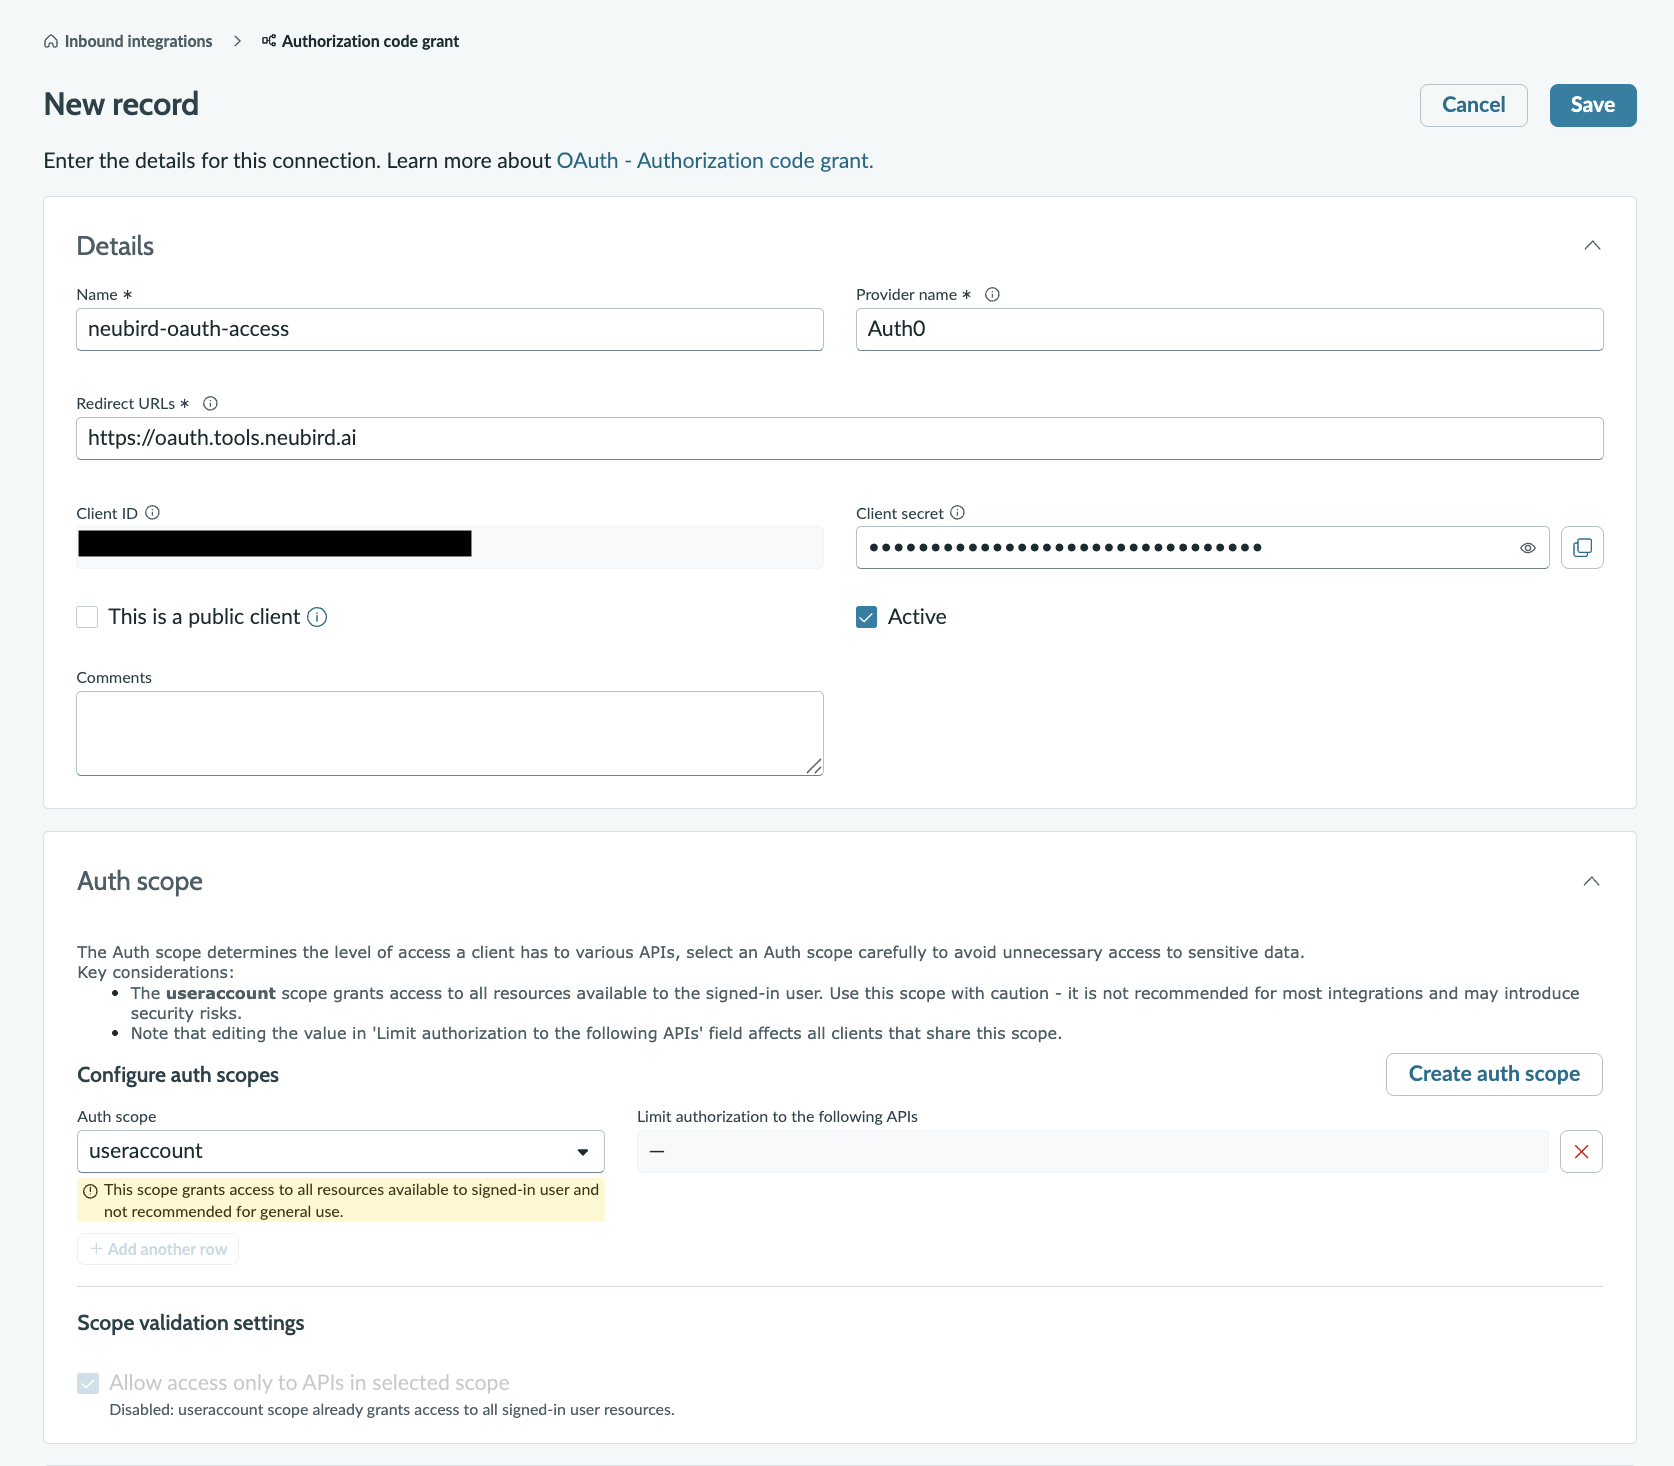
Enter the integration details: Complete the New record form as follows, then click Save.
- Name: a descriptive name, for example
neubird-oauth-access. - Provider name:
Auth0. - Redirect URLs:
https://oauth.tools.neubird.ai. - This is a public client: leave unchecked, because NeuBird authenticates with a client secret.
- Active: checked.
- Auth scope:
useraccount.
About Auth scope:
useraccountgrants the integration access to everything the signed-in user can reach, and ServiceNow flags it as broad. NeuBird only reads and writes incident and service-request data through the Table API, and the REST API Access Policy in Step 3 is what actually bounds the integration to the Table API. To narrow it further, click Create auth scope, define a scope limited to the Table API, and select it here instead. - Name: a descriptive name, for example
-
Copy the credentials: After saving, ServiceNow populates Client ID and Client secret on the record. Copy both, because you will paste them into NeuBird. Use the eye icon to reveal the secret and the copy icon next to it to copy it.
Step 2: Create an OAuth Inbound Authentication Profile
Section titled “Step 2: Create an OAuth Inbound Authentication Profile”-
Open Inbound Authentication Profile: Click All and search for
inbound auth. Under System Web Services > API Access Policies, select Inbound Authentication Profile.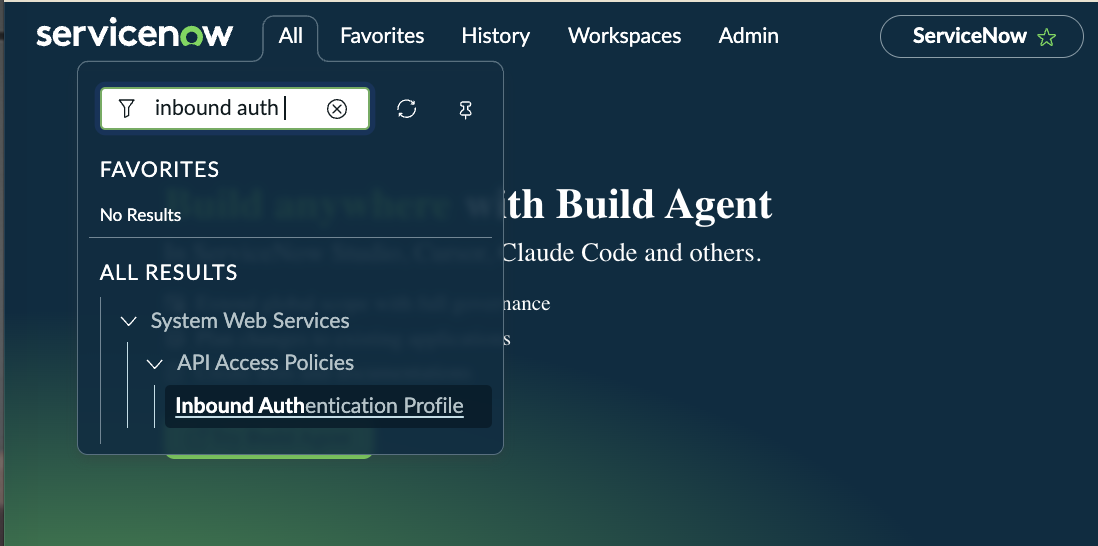
-
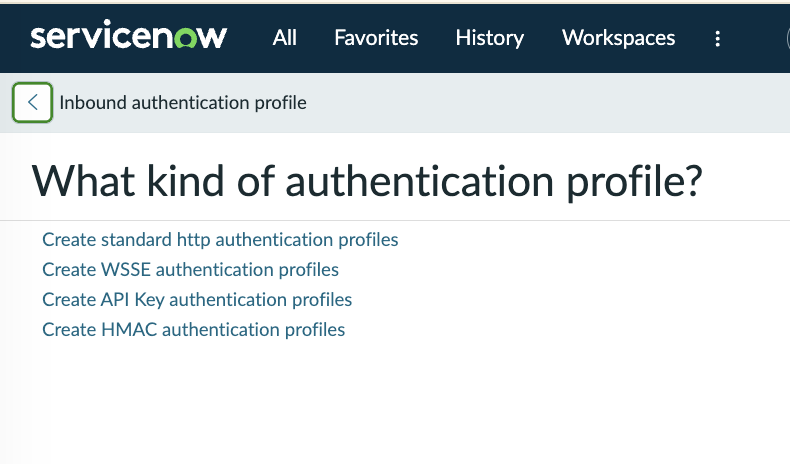
Choose the profile type: Click New, then select Create standard http authentication profiles. (The API Key profile type is used for the API key flow in Option 1. For OAuth you need the standard HTTP type.)
-
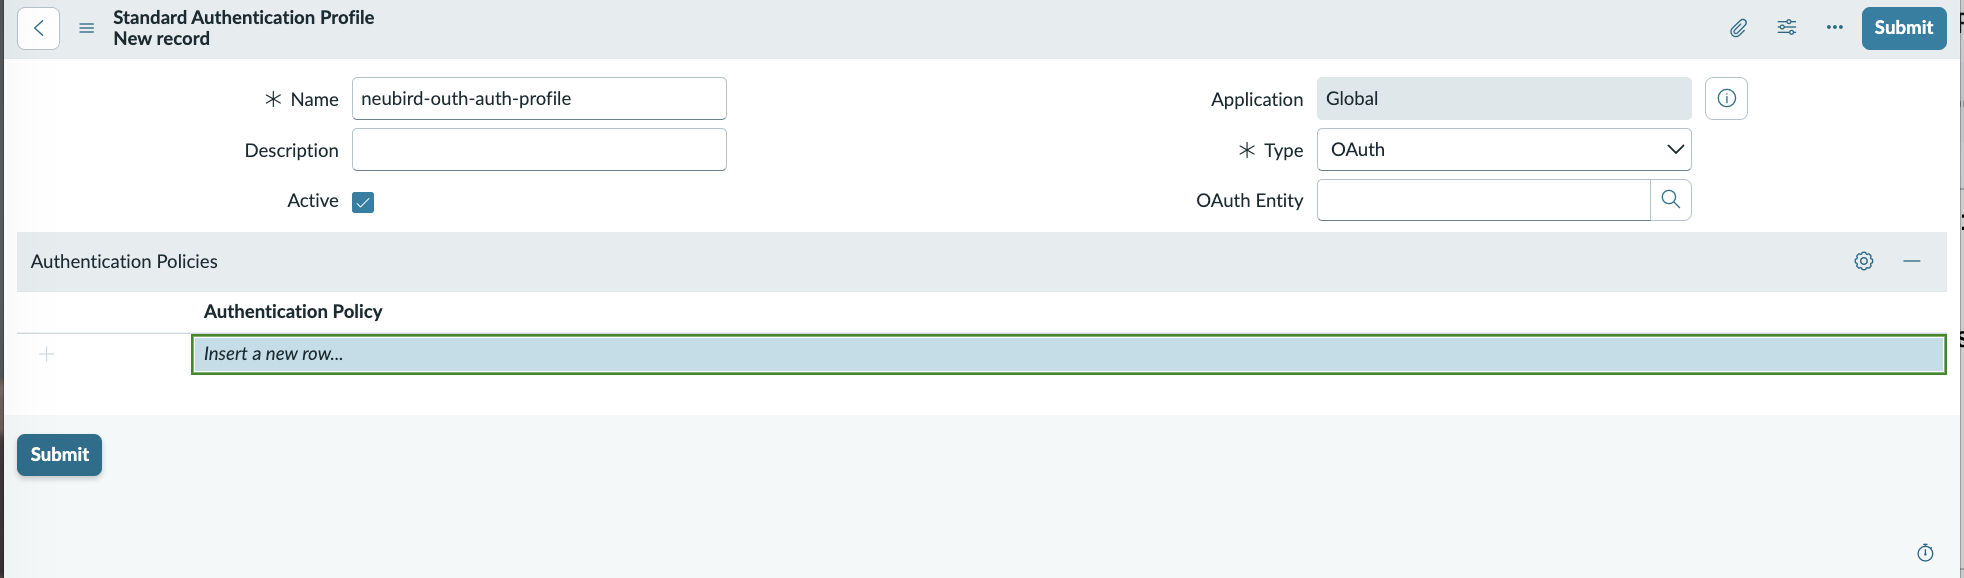
Fill in the profile: On the Standard Authentication Profile form:
- Name: a descriptive name, for example
neubird-oauth-auth-profile. - Type: select OAuth.
- Active: checked.
- OAuth Entity: use the lookup (magnifier) icon and select the inbound OAuth integration you created in Step 1 (
neubird-oauth-access).
Click Submit to save the profile.
- Name: a descriptive name, for example
Step 3: Create the REST API Access Policies
Section titled “Step 3: Create the REST API Access Policies”Follow REST API Access Policies, selecting the authentication profile you created in Step 2 (neubird-oauth-auth-profile) on each policy.
REST API Access Policies
Section titled “REST API Access Policies”These policies apply to both setups above — API key and OAuth alike. Create all three, attaching the authentication profile from whichever option you followed to each one. If a REST API is missing from the REST API list, see Troubleshooting.
-
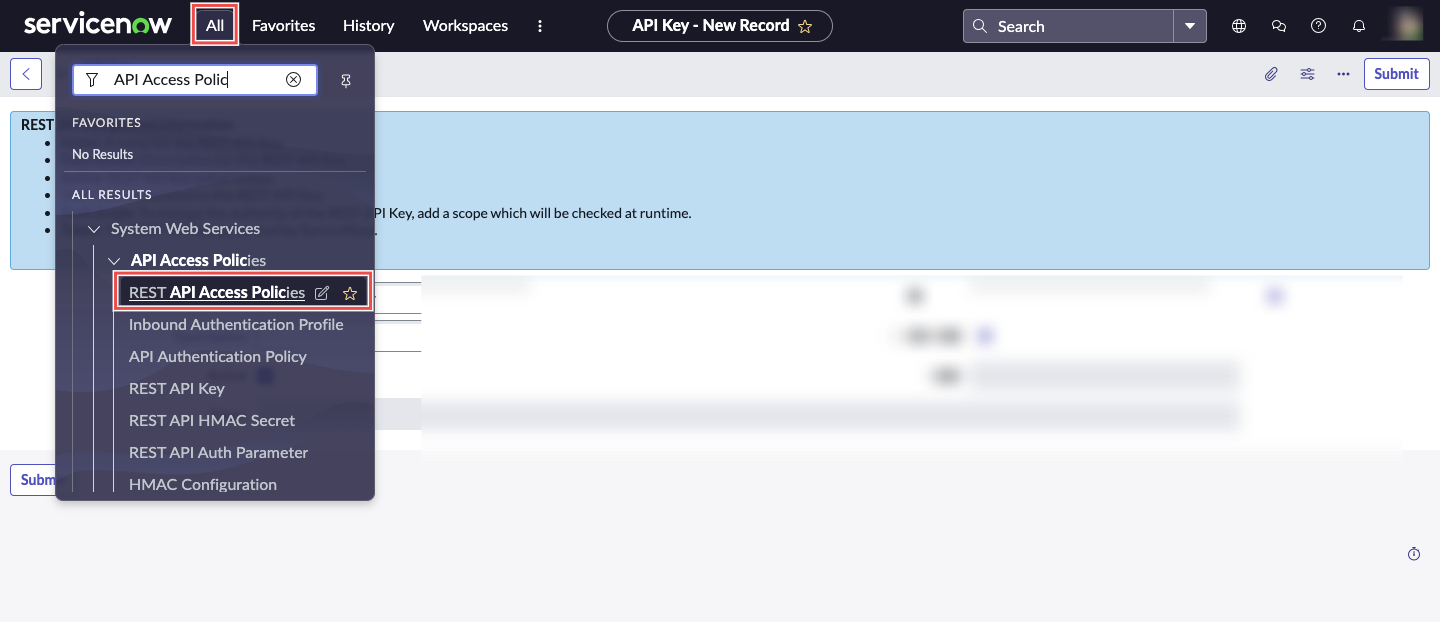
Open REST API Access Policies: go to All > System Web Services > API Access Policies > REST API Access Policies.
-
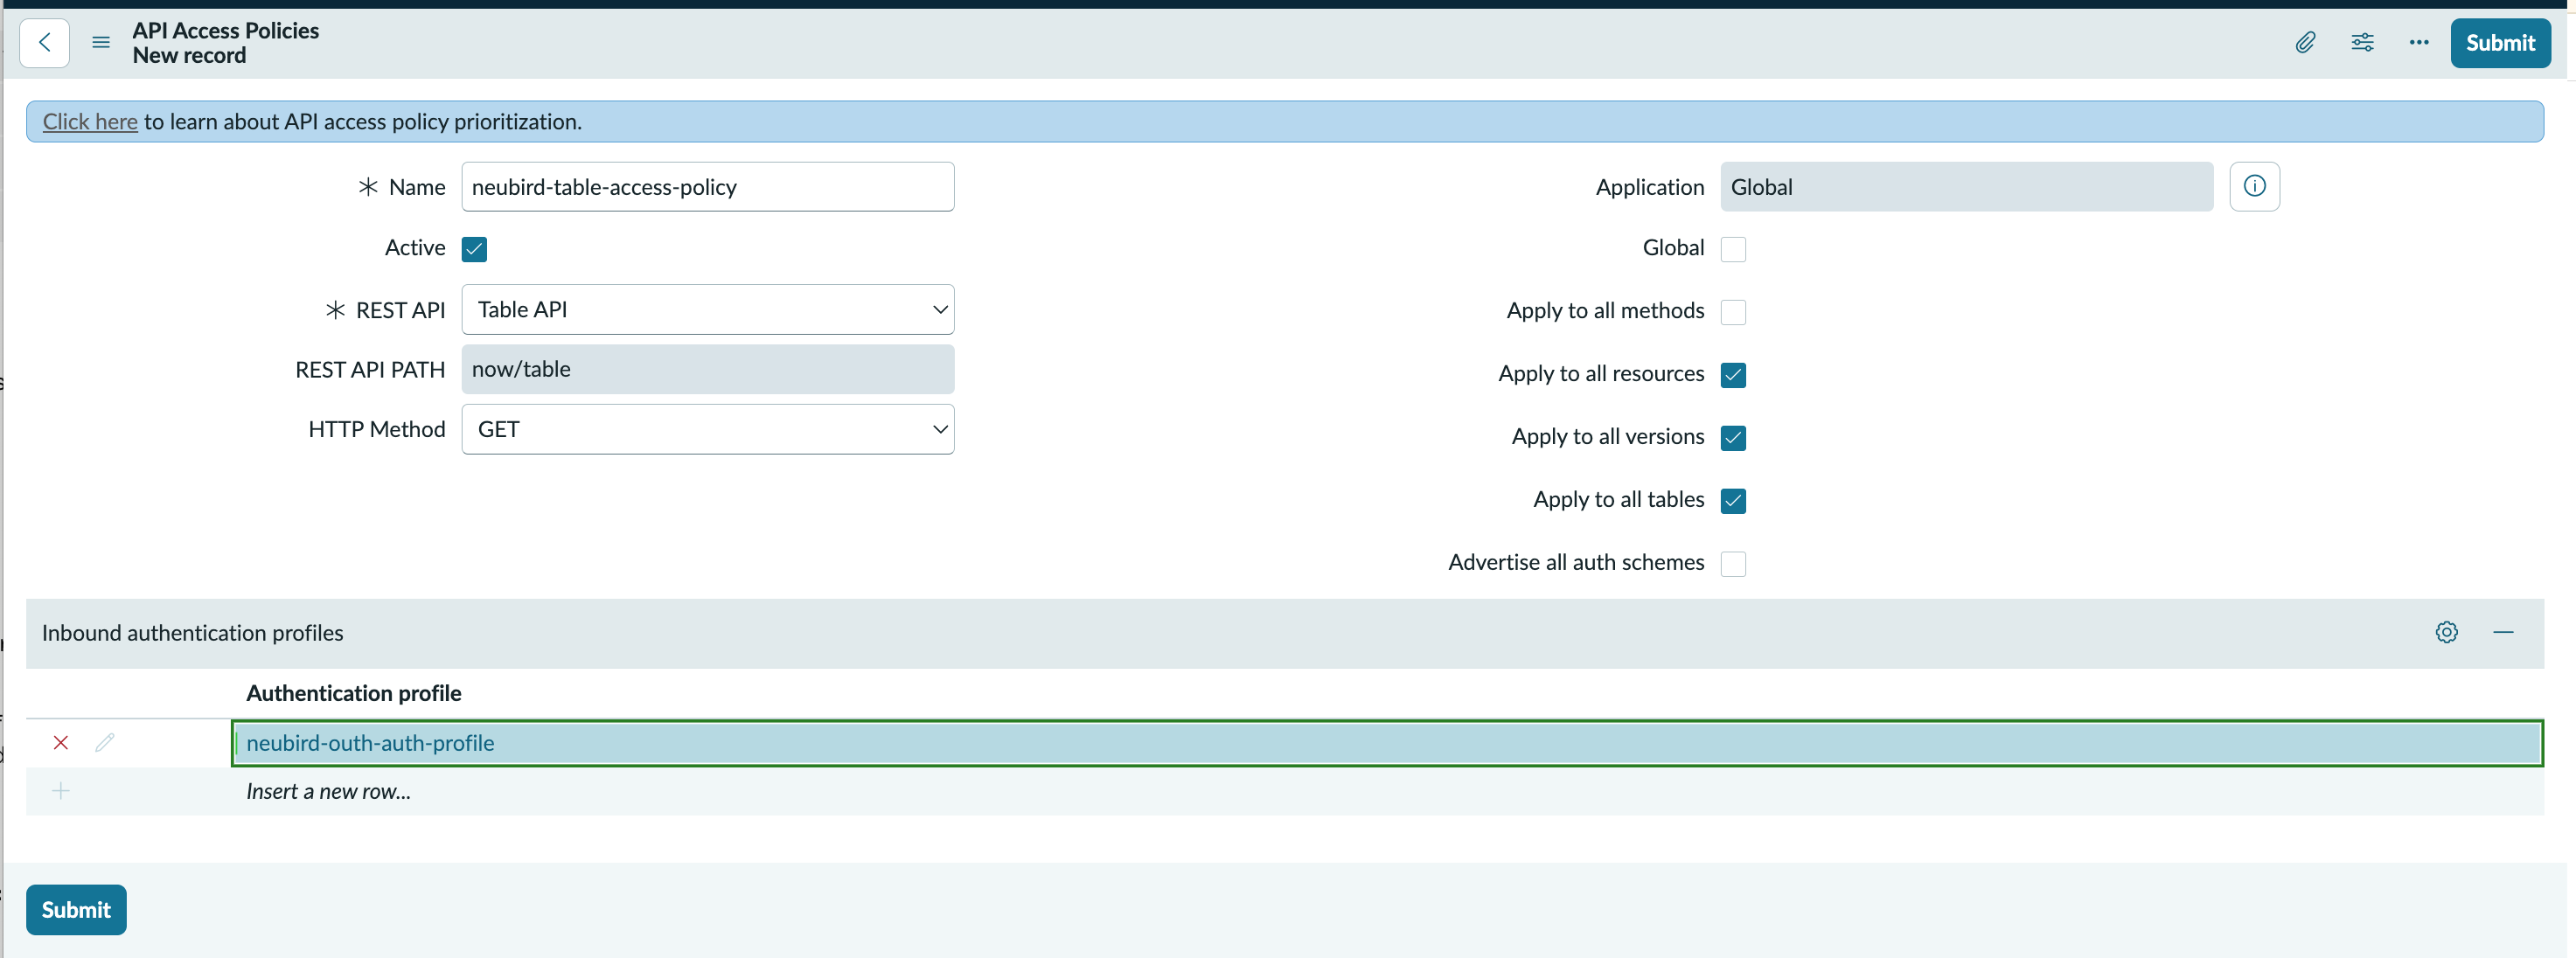
Create a policy: click New, then complete the form using the settings for each API below.
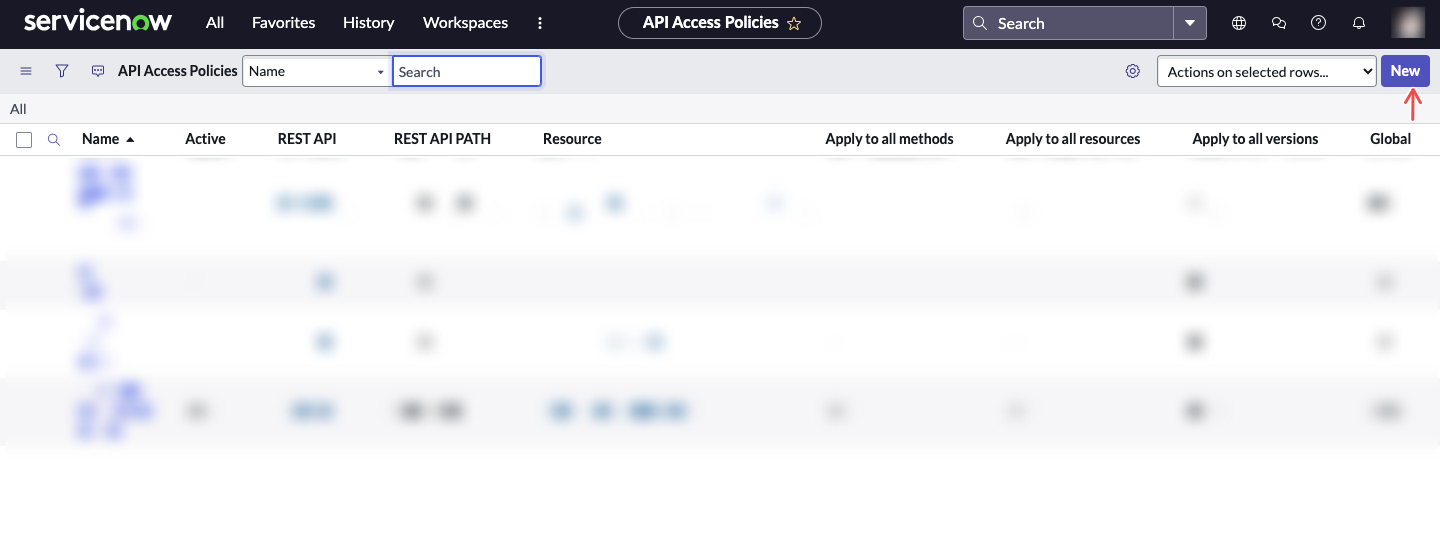
Repeat step 2 for each of the three APIs. Leave Advertise all auth schemes and Global unchecked on every policy: the first makes ServiceNow advertise every configured authentication scheme on the API, and the second widens the policy beyond the Global application scope.
Table API
Section titled “Table API”Required. Grants read access to incidents and service requests.
- Name: a descriptive name, for example
neubird-table-access-policy. - Active: checked.
- REST API: select Table API. REST API PATH fills in automatically as
now/table. - HTTP Method: GET.
- Apply to all resources, Apply to all versions, Apply to all tables: checked.
- Apply to all methods: leave unchecked, so the policy stays scoped to GET.
- Inbound authentication profiles: in the embedded list at the bottom of the form, insert a row and select your authentication profile.
Knowledge Management REST API
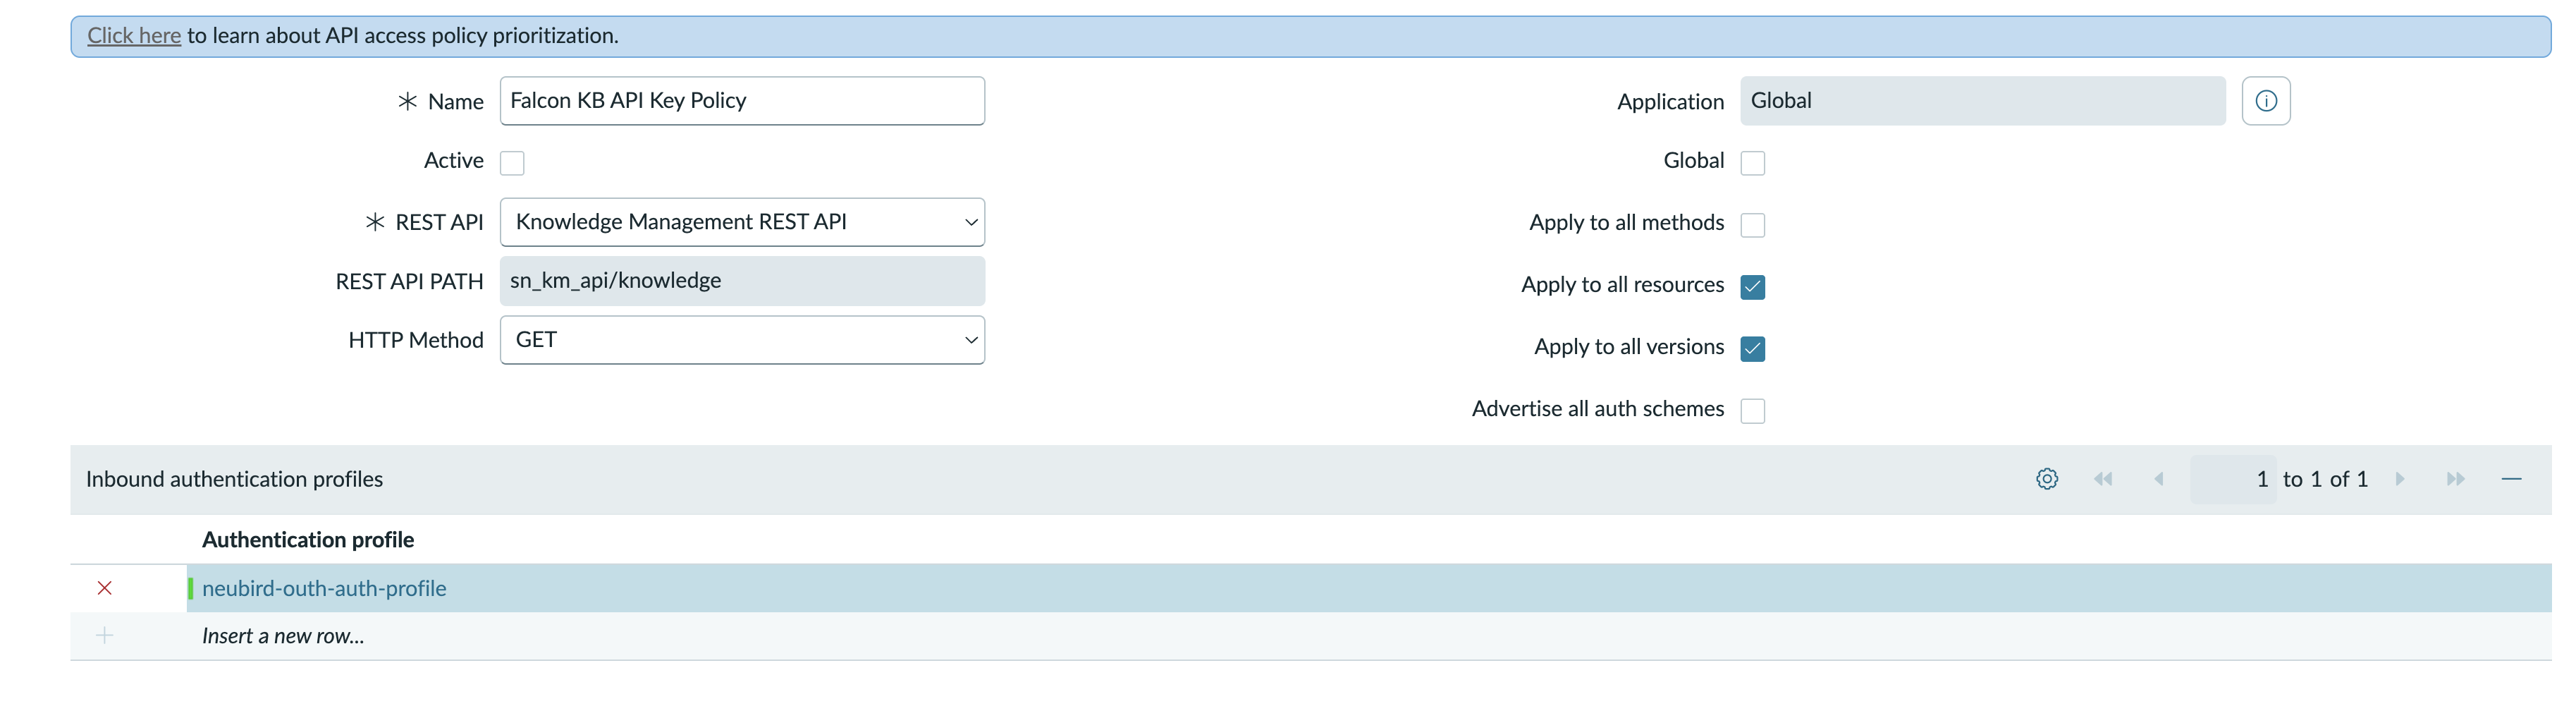
Section titled “Knowledge Management REST API”Grants read access to knowledge base articles, so runbooks and known-error records held in ServiceNow can be used as evidence during an investigation.
- Name: a descriptive name, for example
neubird-kb-access-policy. - Active: checked.
- REST API: select Knowledge Management REST API. REST API PATH fills in automatically as
sn_km_api/knowledge. - HTTP Method: GET. NeuBird only reads.
- Apply to all resources and Apply to all versions: checked.
- Apply to all methods: leave unchecked, so the policy stays scoped to GET.
- Inbound authentication profiles: in the embedded list at the bottom of the form, insert a row and select your authentication profile.
Aggregate API
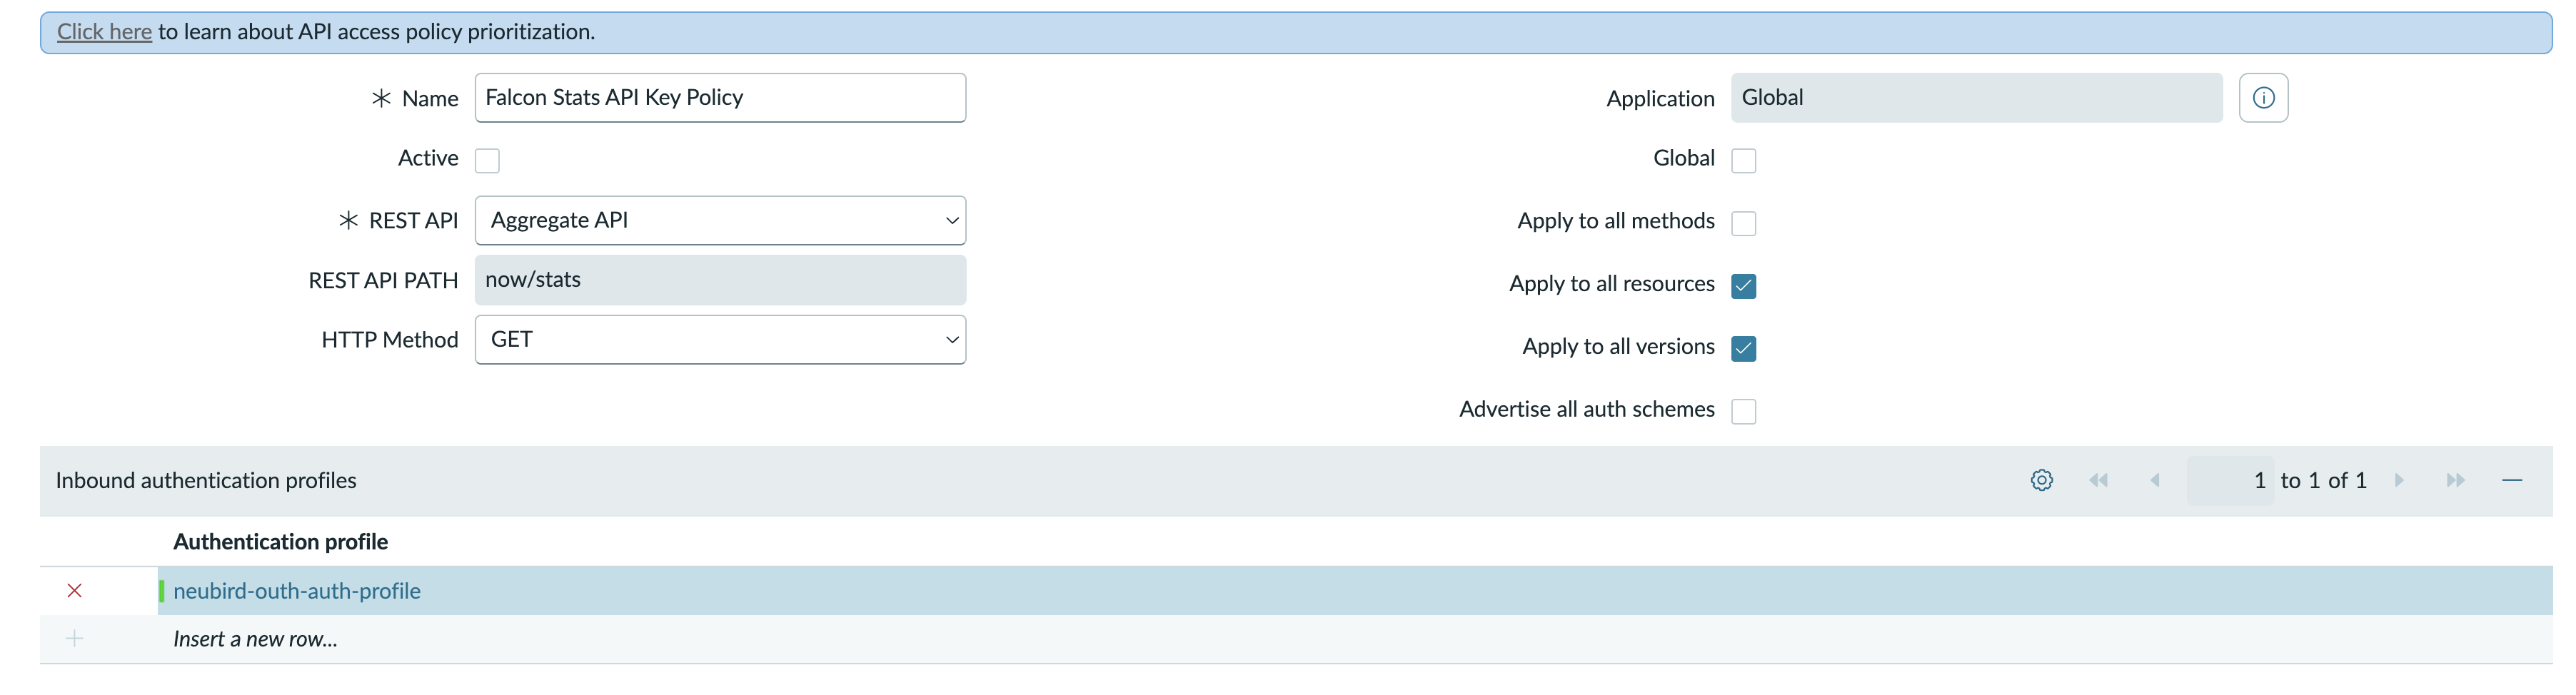
Section titled “Aggregate API”Grants read access to aggregate queries, which return counts and rollups over a table instead of individual records.
- Name: a descriptive name, for example
neubird-stats-access-policy. - Active: checked.
- REST API: select Aggregate API. REST API PATH fills in automatically as
now/stats. - HTTP Method: GET.
- Apply to all resources and Apply to all versions: checked.
- Apply to all methods: leave unchecked.
- Inbound authentication profiles: in the embedded list at the bottom of the form, insert a row and select your authentication profile.
Add the Connection in NeuBird
Section titled “Add the Connection in NeuBird”-
In NeuBird, go to Settings > Connections and click Add Connection.
-
Select ServiceNow.
-
Enter a Name and, optionally, a Description.
-
Choose the authentication tab that matches the setup you completed:
Credentials (API key)
- Enter the API Key (the REST API token from Option 1) and the Customer ID (your instance URL).
- Click Save.
OAuth
- Enter the Customer URL, Client ID, and Client Secret from Option 2, Step 1.
- Click Connect to ServiceNow. You are redirected to your ServiceNow instance to sign in and approve the requested access.
- After you approve, ServiceNow returns you to NeuBird and the connection is created automatically.
Troubleshooting
Section titled “Troubleshooting”| Symptom | Likely cause |
|---|---|
ServiceNow shows redirect_uri_mismatch after sign-in | The Redirect URLs value on the inbound OAuth integration does not exactly match https://oauth.tools.neubird.ai |
| Sign-in succeeds but the connection fails validation | The REST API Access Policy (Step 3) is missing, inactive, or not linked to the OAuth authentication profile |
401 or 403 responses on incident data | The consenting ServiceNow user lacks read access to the incident or service-request tables |
| Knowledge Management REST API is missing from the REST API list | The Knowledge API plugin is not installed on the instance — see Enable the Knowledge API plugin |
| Knowledge base articles never appear in investigations | The Knowledge Management policy is missing, inactive, or not linked to the authentication profile |
Enable the Knowledge API plugin
Section titled “Enable the Knowledge API plugin”The Knowledge Management REST API only appears in the REST API list once the Knowledge API plugin (sn_km_api) is installed. On instances where it is missing, install it first, then create the Knowledge Management REST API policy.
-
Open Plugins: click All, search for
plug, and under System Definition select Plugins.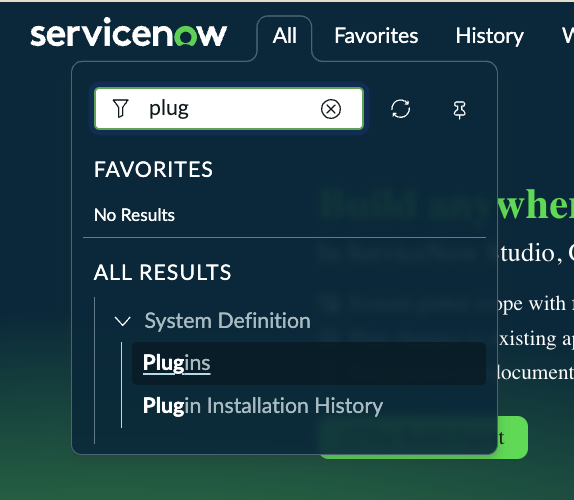
-
Find the plugin: in Application Manager, search for
sn_km_api. The Knowledge API entry appears under Store applications. If it is already installed it shows under the Installed tab; otherwise install it from Available for you.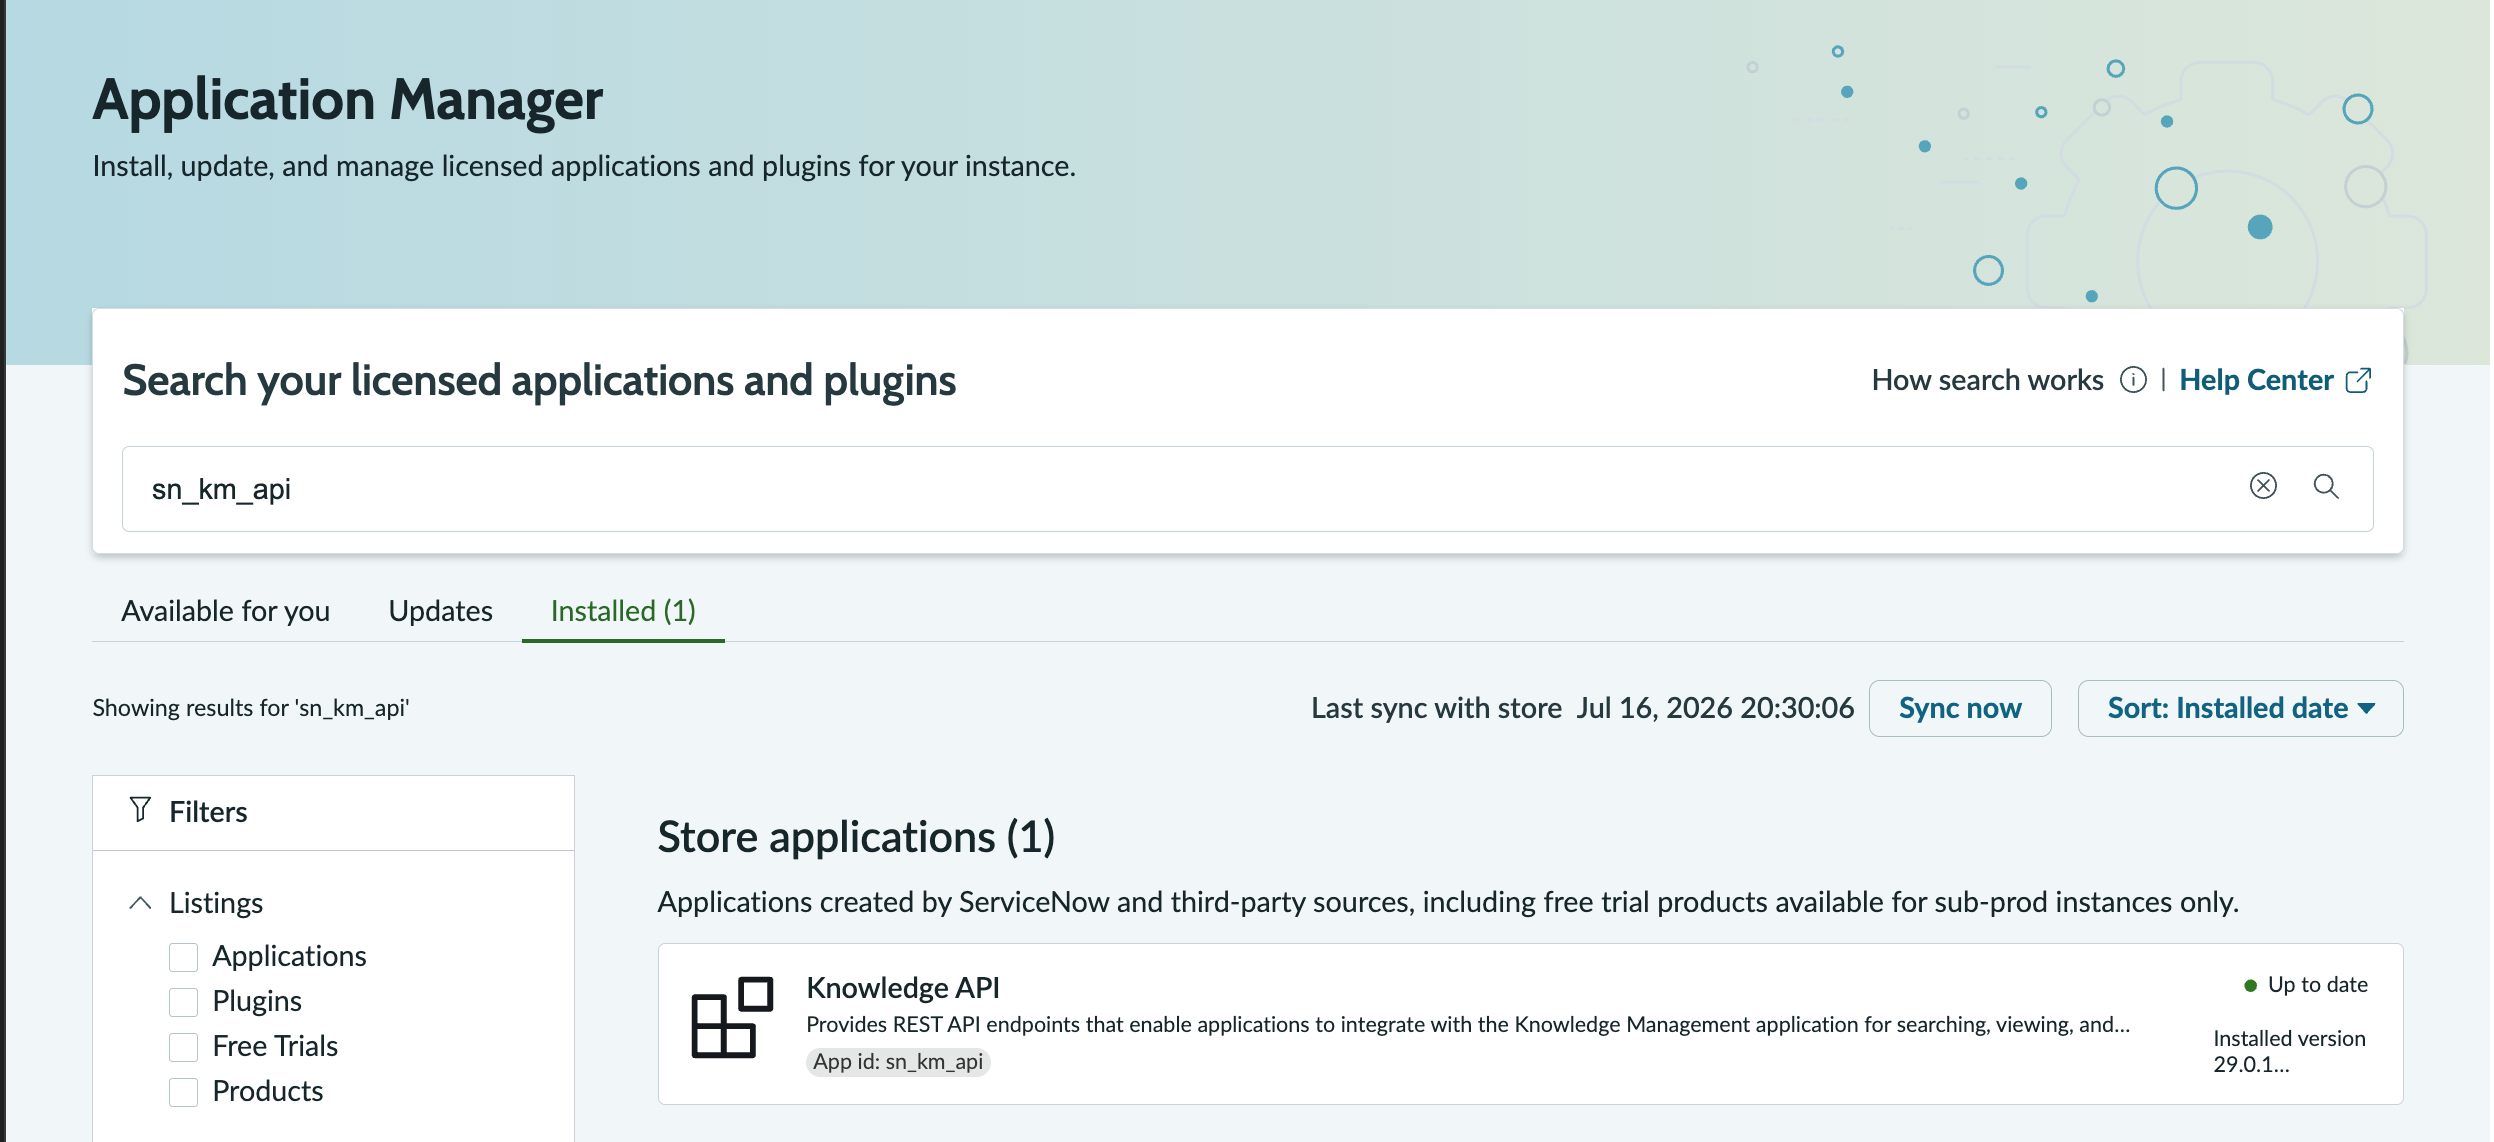
-
Confirm it is ready: open the entry and check that Get started reports the application is installed and ready on your instance.
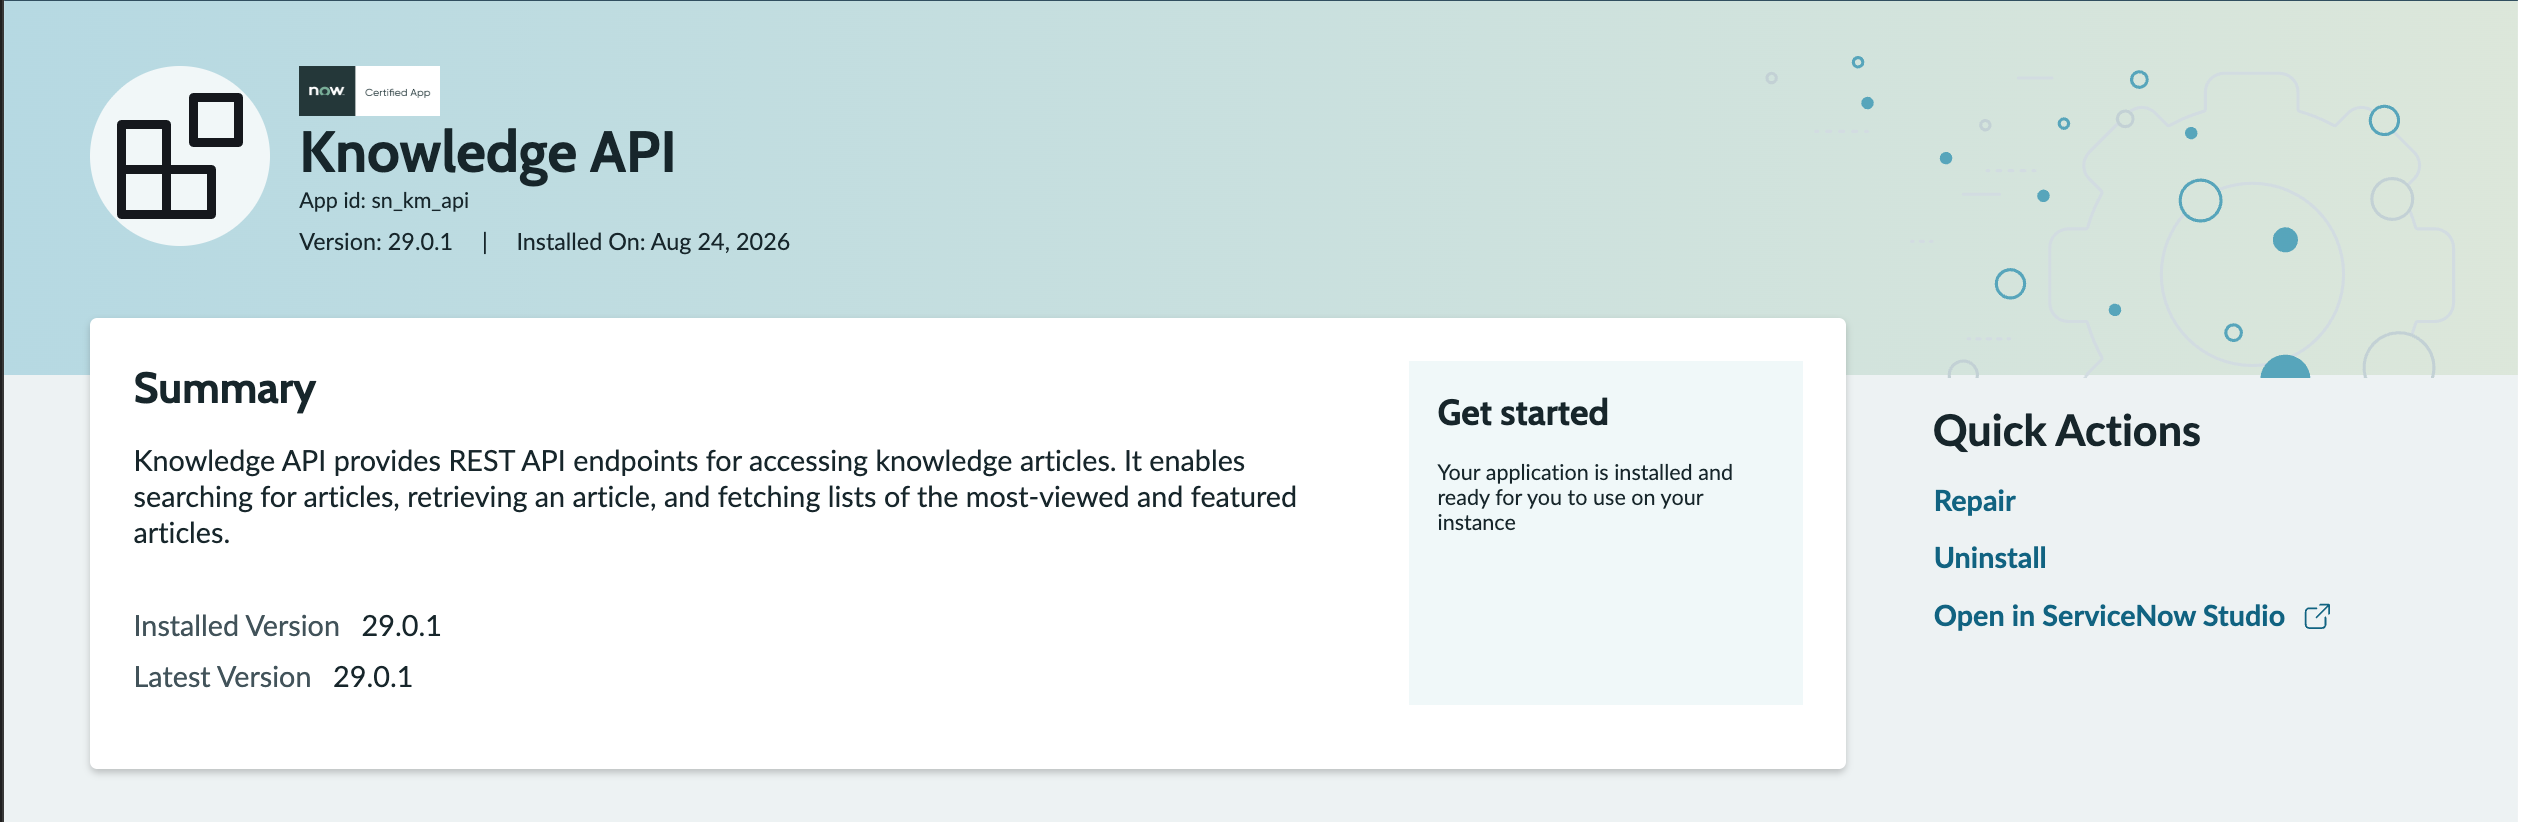
Return to REST API Access Policies and create the Knowledge Management policy. REST API PATH now fills in as sn_km_api/knowledge.
Connection Fields
Section titled “Connection Fields”Credentials (API key)
Section titled “Credentials (API key)”| Field | Required | Description |
|---|---|---|
| Name | Yes | A descriptive name for this connection |
| Description | No | An overview of what this connection is used for |
| API Key | Yes | The REST API token generated in the steps above |
| Customer ID | Yes | Your ServiceNow instance identifier (e.g., https://yourinstance.service-now.com) |
| Field | Required | Description |
|---|---|---|
| Name | Yes | A descriptive name for this connection |
| Description | No | An overview of what this connection is used for |
| Customer URL | Yes | Your ServiceNow instance URL (e.g., https://acme.service-now.com) |
| Client ID | Yes | The Client ID from the inbound OAuth integration in ServiceNow |
| Client Secret | Yes | The Client Secret from the inbound OAuth integration in ServiceNow |
For general instructions on creating and managing connections, see the Connections Overview.